Show me info on:
UI Design
|
Can I make an Element larger than its parent, or position it outside the parent?
Yes, you can use this technique with content you want to scroll, such as the content of a Scroll View. Use the child Element Constraints in the Properties tab, or select the Element and use the arrow keys on your keyboard. On the Canvas, you will only see the visible parts of the Element when it is not selected. If it is completely outside the bounds of the parent, you can only select it via the Element Tree.
|
|
How do I scroll content?
Certain Elements such as Tables and Lists will automatically scroll depending on their content, however you can create scrollable content manually in your app using Scroll Views. Place a Scroll View in your page and add content inside it that extends beyond its visible area (for example a Scroll View filling the page, with an Element placed inside it but below its bottom edge). You can use the Styles > Constraints values or the keyboard to position the child Elements. The scroll view will automatically allow the user to scroll to see all of the content inside it.
|
|
How can I line my Elements up?
You can use the smart guides that appear as red lines on the Canvas when you’re dragging an Element over a page. The lines indicate alignments with other Elements, and the center points within the page or parent Element you are dropping the Element on. If you can’t see the smart guides, use the Preferences button next to the Canvas and check the checkbox.
 
|
|
How can I stop the keyboard obscuring my elements?
If your page supports text entry the mobile device soft keyboard will cover part of the page during user input. To prevent this making your elements inaccessible, place your elements inside a Scroll View so that the content is accessible via scrolling.
|
|
How do I center an Element in the page?
You can center an Element either using smart guides or constraints. To center using smart guides, drag the Element on the Canvas and use the red lines that appear to drop the Element in the center of the page / a parent Element, or in alignment with another Element. Use the Preferences button to the bottom right of the Canvas to turn smart guides on if you can’t see them. Bear in mind that your layouts will appear different on the variety of device screen sizes available, and that relative constraints can help to achieve layouts that scale effectively.
To center using constraints, select the Element on the Canvas (or in the Element Tree) and open Properties > Constraints on the right of the editor. To center an Element by making its width or height adjust automatically according to the space either side of it, use the center modes and set equal values for the available constraints (e.g. to center horizontally you could set 10% relative, or 10px fixed for both left and right values, and the width will adjust to fill the remaining space).
You can alternatively center an Element in the other modes by using relative values, for example specifying 80% width and 10% left constraints (or 80% width and 10% on the right). Choose a combination that works for your layout – finding the right configuration will often require trial and error, testing on different device screen sizes. |
|
How do I customize an Element’s appearance?
Once an Element is selected on the page, use the right sidebar to style it. The Properties tab Styles and Constraints sections provide you with the tools to control how the Element looks and scales in the page layout. You can also set styling properties on an Element while your app is running using the Set Value Action.
|
|
How do I display an ad in my app?
You can display AdMob ad units in your app using the AdMob Banner Ad Element. Drag the Element onto a page and, in Properties on the right of the editor, enter the Ad Unit ID from your AdMob account.
You can alternatively display an interstitial ad to your app using the Present Interstitial AdMob Ad Action. To display any kind of AdMob ad in your app, in your Firebase Settings on the left of the editor, enter the App ID from your Firebase account. Note that Google requires use of test ads only during development, so you will need to swap your live ad IDs in before deploying your app – see the Always Test with Test Ads guidance and the Test Ads documentation. |
|
How do I know what an Element is for?
Hover over the
|
|
How do I make an Element dynamic?
Select the Element on the Canvas or Element Tree and open Properties > Styles. For the Content property, select Dynamic from the drop-down list. This process applies to Tables, Page Controllers, and View Pagers. Android provides dedicated Dynamic List Elements.
|
|
How do I make an Element scale relative to the page?
Select the Element and open Properties > Constraints. In the Constraints controls for most Elements, you can choose relative values to enter a percentage for width or height that will set scaling relative to each parent Element (including the page, which is the parent of all other Elements on your Canvas).
 Using relative values also means that your Elements will render proportional to whatever screen size the user has, as the page will fill the screen when the app runs. You can also use the center modes for width and height to specify an Element’s size and position via its left and right (horizontal) or top and bottom (vertical) values, making the width and/or height automatically adjust to full the remaining space.  Note that certain Element constraints are predefined by the native platform class and therefore cannot be altered. |
|
How do I move one Element inside another?
You can create parent and child relationships between Elements. Drag the child Element on top of the parent on the Canvas – if the target Element is a valid parent you will see a dotted outline around it – drop to create a child relationship. You can also rearrange the page hierarchy in the Element Tree on the right – click and drag to move an Element, using the indicator line to drop an Element as parent, child, or sibling to the one above it.
|
|
How do I resize an Element?
You can resize an Element by clicking and dragging it on the Canvas or using the right sidebar. With the Element selected on the Canvas or Element Tree, open Properties > Constraints. Here you can set fixed or relative values for the width and height of each Element, as well as setting its width/height to scale automatically depending on the left, right, top, and bottom Constraint values.
|
|
How do I scale an image for display?
Dropsource will scale your images for different device sizes. If you have an image set as an asset for an Image Element, you can use the controls in the Properties tab on the right to configure how your image scales to display inside the Element, as well as setting how the image aspect is handled when it is scaled.
|
|
How do I select an Element I can’t see on the Canvas?
If you have an Element that is out of view on your Canvas, for example a View inside a Page Controller or View Pager, you can select it using the Element Tree on the right of the editor. It’s easier to know which Element is which if you rename them in a way that makes sense in your app. If you want to make a hidden Element visible, such as a View inside a Page Controller or View Pager, select the parent Element and use Properties > Styles to set the visible View.
|
|
How do I set an Element’s default value?
Text and input Elements can have default values – to set one select the Element on the Canvas or Element Tree. Open Properties > Styles, and use the Text or Value section. Use the controls to give your Element a value that will appear when it is first presented to the user. Note that you can also set Element values using the Set Value Action.
|
|
How do I set landscape mode?
You cannot currently control app orientation in Dropsource, with the editor optimized for portrait display.
|
|
How do I tell which Element is which in the Element Tree?
Your Elements are automatically named by type, with a number starting at 1 and incrementing each time you add a new Element of that type to the page. To make selecting Elements easier, rename them in the Properties tab, using the button that appears at the top, next to the name.
|
|
What format images can I use?
Your images can be either PNG or JPEG format. For images displayed in an area with transparency, for example in the background, you will need PNG files. You cannot include images in other formats such as GIF directly in your project, however you can load images stored externally using the Display Image from URL and Set Value Actions, as well as using Web Views to display any external content via a URL.
|
|
What if I can’t see the property I want to change?
If you can’t change an Element the way you need to you may be able to achieve your desired functionality using a plugin. Get in touch help@dropsource.com for help.
|
|
What if I don’t see the Element I need?
Dropsource is pluggable! You can add your own custom Elements via plugins and access them in the editor. Get in touch help@dropsource.com for more information.
|
|
What is an Element?
Each Element represents a native class on the iOS or Android platform. Drag Elements onto the pages in your app to build its UI. Move and resize Elements on the Canvas, configuring styling and interaction in the Properties tab on the right. Use the Element Tree to control an Element’s place in the page hierarchy. You can reference Elements in Action and API request fields.
|
|
What is elevation in Android?
You can use the Elevation property on your Android Elements to specify the relative depth an Element appears at – this determines the distance of its shadow. See the Material Design Guidelines for more.
|
|
What is the difference between an icon and an image?
In some of the Elements you use in your apps you will see sections for setting icons in the Properties tab. You can use image assets you have uploaded for these, bearing in mind that icons are typically displayed at a small scale and often display best with transparency in the background.
|
|
What kinds of color values can I use?
You can specify color values in the Properties or Actions for an Element either by clicking the color to open the color palette and selecting visually or by typing an RGB (or RGBA) or HEX value into the text field.
|
|
What media items can I use?
You can currently only use image assets in your app. Upload JPG or PNG files to use in your UI. These will be included with your app when it is installed on the user device. To set an image as an asset for an Element, select the Element and use the Properties > Styles section. You can stream audio and video media in your app using a Web View and you can play a video file from a URL using the Play a Video Action, or download an audio file to play using the Create an Audio Session and Download Remote File Actions.
|
|
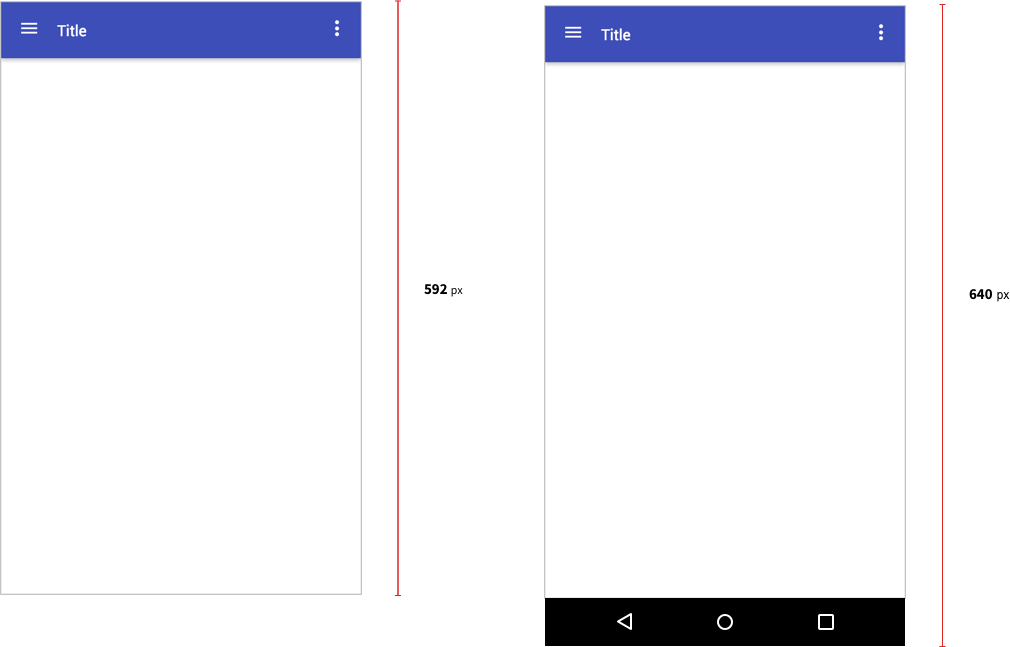
What screen size is the Canvas?
The Canvas size is representative of:
Note that the Android Canvas requires a navigation bar, so to accommodate this an area at the bottom of the screen is not editable.
|
|
What size should the splash screen image be?
Check out the official guidance for iOS resolutions.
The splash screen is not a standard feature on Android but our team recommends 1080×1920, which is the Google Pixel resolution. |
|
What’s the difference between the card view and page controller / view pager view?
The Card Deck / Swipe Views provide swipe navigation for content in a page similar to Page Controllers / View Pagers, however when you swipe a Card, the View is removed from the parent Element. Any of these Elements can display dynamic content from API requests.
|
|
Which Element do I need to show an array in an API response?
You will see an array in an API response represented as a Data Source. You can bind a Data Source to a dynamic Elementhelp. You should place a single child Cell, Tile, or View inside the Element, and bind any fields inside the array to Elements placed inside these child Elements. You can also carry out processing on each item in an array using the Iterate through Array Action.
|
|
Which Elements can have parent and child relationships?
You can only create parent and child relationships between certain Elements. For example, a Table Cell can only be placed inside a Table, and a List Tile can only be placed inside a List. Pager Views / Page Controller Views can be placed inside Page Controllers and View Pagers, and can in turn contain other Elements. When you use the Element Tree to move an Element, the indicator line will be green for valid drop locations, and red for invalid locations.
|
|
Why can’t I drop an Element where I want in the Element Tree?
The validity of a drop position is determined by the relationship rules between Elements in the Canvas, which are in turn informed by the UI conventions on the iOS and Android platforms. You can only move child Elements inside valid parent Elements for their type.
|
|
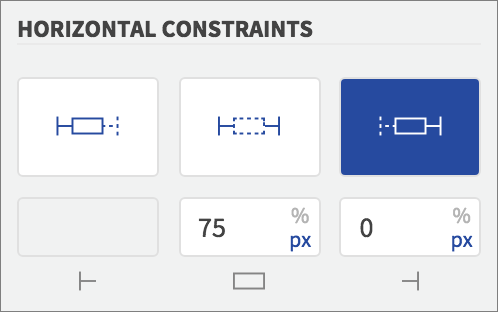
Why can’t I edit a Constraint value?
Which Constraint values are editable depends on the Element type, and on the Constraint mode you have selected. Some Element constraints are predefined and cannot be edited at all. In most cases you can edit using one of the following selections for horizontal size and position:
For vertical size and position you can specify:
These allow you to specify how your Elements should scale and position in the available space on the user device screen. Use fixed pixel values to set size and positioning that will remain the same for different device screens or relative percentage values for layouts that will scale to the user screen. In many cases you will use a variety of fixed and relative values to implement your page designs. |
|
Why does my Element look different when it’s tapped?
You can set style for an Element in different user interaction states using Properties > Styles. Any available states for an Element will be listed there, for example Highlighted and Selected – select a state and set styling properties for it. You can also use the Set Value Action to set Element Properties dynamically.
|
|
Why is my Constraint value changing?
Your Constraint values will change in some cases when you move or resize an Element on the Canvas, but your selected Constraint mode will stay the same. Note that all values for both relative and fixed Constraints will be rounded to two decimal places.
|
|
Why isn’t my negative Constraint working?
Negative margins are not supported on the Android platform, so although you can set them in the Dropsource editor, they will not work in your compiled Android app.
|
|
Why won’t my image upload?
Your images may fail to upload if your system clock is out of sync with the correct time – if you synchronize your computer clock the issue should be resolved. If you’re having trouble seeing your images rendered correctly in your compiled app, this may be due to unnecessary metadata or compression on the images when you uploaded them into Dropsource.
|
|
Why isn’t my floating action button staying in place?
If you’re using a Floating Action Button on Android, depending on your layout you may need to uncheck the Scroll Enabled property on the page to achieve a consistent position for the button.
|


Pages and Navigation
|
How do I add menu buttons to the App Bar?
Select the App Bar on the Canvas and open Properties > Styles. Use the Action Icons section to add buttons and configure their properties. You can set the number of visible buttons together with the type, which can be text or icon with overflow text. To respond to button taps, open the Events section.
|
|
How do I add to a Tab Bar?
You can only use one Tab Bar in a single app, and any pages you create with the Tab Bar selected will be presented inside it.
|
|
How do I pass data from one page to another?
You can use Page Variables to pass data around the pages in your app. In the target page, add a Page Variable on the right of the editor. Choose a name and type – check the box to indicate that the variable is required during inbound navigation, which will prompt you to supply the value when you add a Go To Page Action navigating to the target page.
|
|
How will users navigate between the pages in my app?
You can configure page navigation in your app when user interaction and other events occur. For example, to move to another page when the user taps a Button, select the Button Element and open Properties > Events. Add an Action to the Tapped Event and select either Go Back or Go To Page.
You can also use the Navigation Bar on iOS to achieve standard back navigation when the user taps the left action button, by selecting the page Element and checking Back Button Enabled in Properties (you need to use a push transition to navigate to the page in order for this to work). The text you set as Back Button property will display when users are navigating back to a page. |
|
How can I change the back button behavior on Android?
On Android you can alter the default behavior of the user’s device back button. Select a page in your project and open Properties on the right of the editor. In Styles you’ll see checkboxes for Disable Back Button and Maintain Default Back Button Behavior. Combine these with Actions in the On Back Pressed Event to achieve the behavior you need when the user presses back. If you maintain the back button behavior, the user will navigate back after any Actions added to the On Back Pressed Event have executed.
|
|
What is a page?
A page represents a single app screen, including any Elements you drag onto the Canvas. You can style and respond to interaction with page components by selecting them on the Canvas and using the Properties tab on the right.
|
|
What’s the difference between a view and a page?
A View can function like a page in your app, and certain Views can be placed inside containers such as Page Controllers and View Pagers. Users can then navigate between Views by swiping or selecting tabs. The iOS and Android operating systems both use the concept of views, but they model the single pages in an app differently – typically as View Controllers on iOS and an Activities on Android.
|
|
Which transition should I use?
Typically you can choose whichever page navigation transition that suits the visual experience you want your users to have. However, if you are using the Nav Bar Back Button Enabled property, you will need to select the
push transition.
|
|
How do I edit page configurations after a page is created?
To change the navigation elements that appear above and below a page, such as the App Bar, Nav Bar, and Tab Bar, hover over the page in Pages on the left of the editor and select Edit Navigation.
Select and/or deselect components to add and remove them. |
|
Why can’t I resize the page config elements?
The Navigation Bar, App Bar, and Status Bar have preset dimensions and positioning as part of their respective platforms. However, you can customize their style in the Properties tab, and respond to interaction with their buttons in Events.
|
|
How do I edit page navigation elements?
To edit navigation properties for pages with Nav Bars and Tab Bars, select the page and use Properties on the right of the editor.
|
|
How do I open a Tab Bar page without the user tapping it?
By default your users will be able to open pages in Tab Bars by tapping its tab, however you can open a page in a Tab Bar using Actions. Add a Set Value Action and choose the Tab Bar Selected Index property in the first input, with the index in the second (an Int value) – you can see the index value for each page in its Properties > Tab Bar Item section.
|

API Requests
|
How can I carry out processing on my array responses?
If your API request returns an array, you can process the results using dynamic Element Loaded Events and API request Events. For example, if you have an array response bound to a dynamic Element such as a Table or List, any Events on the Table Cell / List Tile Elements can access the response fields from the array entry being displayed. If you need to carry out Actions on each item in an array, add the Iterate through Array Action to a request Event.
|
|
How can I fix an issue with my API?
If your API is not uploading into your project, you will see error messages detailing the issues. Click the Invalid Spec link in the API uploader for more information about your errors. If you still can’t get your API to upload ask for support by posting in the forum for help. For help working through issues with API requests in your app, check out the troubleshooting guide.
|
|
How do I authenticate a user with Firebase?
To sign a new user up with Firebase auth, add the Sign up user with Firebase authentication Action to an Event in your app, for example the Tapped Event of a “Sign Up” Button, with the email address and password pulled from Text Field Elements.
You can add Actions to respond to the success or failure of sign up in the nested Events. To sign a user in, add the Sign in user with Firebase authentication Action to an Event, for example the Tapped Event of a “Log In” Button, with the email address and password pulled from Text Field Elements (or e.g. from variables if you used the sign up Action first).
You can respond to the success or failure of sign in and access user data via the Event Data in the nested Events. To sign a user out with Firebase auth, add the Sign out user with Firebase authentication Action to an Event. See Authenticate the User with Firebase for a more detailed overview. |
|
How do I authenticate with Slack API?
To authenticate with Slack API you will need a test token. Log into your Slack account and navigate to the Test Tokens page.
Copy the token value and paste it into Dropsource – in the API tab click Set Authentication and enter the value there as a static Swift / Java string. |
|
How do I authenticate with the To Do List API?
If you’re using the To Do List API from the demo library in the Dropsource editor, you’ll need to authenticate your requests. In the API tab, click Set Authentication next to the API. The API requires a unique value, so enter your own email address as a primitive string.
|
|
How do I check the value of an API response?
You can carry out basic validation and processing on the data items returned from your API requests. To check the value of a response field that isn’t inside a Data Source, open the request Events and add an Action to the success Event (e.g. 200 OK). If the field is inside a Data Source, select a repeating Element displaying the Data Source contenthelp and open Properties > Events. Add an Action to the Loaded Event. Add the If Else Action and, in the first argument field, select the response item from the Event Data or Data Source container. Choose an operator and value to test your field against. If you’re trying to check a value on iOS is null/empty, you’ll need to structure your If Else action to check if the Is Empty property is False (not True), and construct your logic accordingly – your test should then work. |
|
How do I display an image from from an API?
To display an image from a URL in an API response, you will need the Display Image from URL Action. Add it to a dynamic Element Event if the URL is in an array, or to a status code Event otherwise – see Handling API Events – Displaying Images.
|
|
How do I display data from an API?
You can display data from an API using the Responses section for your request. See Receiving Responses for an overview, and Handling API Events – Displaying Images if you want to show an image from a URL in a response.
|
|
How do I log a user in via API?
You can implement login and/or signup with a remote service in your Dropsource app using Basic Auth or OAuth2 Password flow. In both cases you will need to implement the auth flow in your API, specify the details in your Swagger/OpenAPI specification, and configure your app to send the required auth details in Dropsource. For Basic Auth, you will typically capture the user’s login credentials using Text Fields for username and password, saving them to variables in the app, and sending the variables with requests via the Auth control in the API tab. See Authenticate API Requests with Basic Auth for a step-by-step guide. For OAuth2 Password, you will typically send a request to the API (often passing user login credentials) to retrieve an access token. You will save the token to a variable in your app and send it with requests via the Auth control in the API tab. See Authenticate Requests with OAuth2 Password for a step-by-step guide. |
|
How do I pass the value of a Device Variable to an API request?
In the API tab, click the request you are working with. Open the Parameters section and select the relevant type from the drop-down list. Click the parameter field and make a selection from the Device Variables container.
|
|
How do I reload an API response?
You can run an API request using an Action at any time. For example, if you have a response bound to a dynamic Element such as a Table or List you can reload the data by choosing the Element, opening Properties > Events, and adding a Run API Request Action to the Refresh Event – then in your request events (e.g.
200: OK) add a Stop Refreshing Table Action.
|
|
How do I send data to an API?
You can send data to an API in the Parameters section for a request. You can pass values from various parts of your app – see Sending Parameters.
|
|
How do I use cached API data?
You can save API request data locally in the app cache. This allows you to manage network connectivity changes and minimize network request frequency. Your app will display any data you have bound to your user interface Elements from the request Responses in the API tab (or from any API Events you have added Actions to). When you add a Run API Request Action to your app, you can choose a Request Mode to determine whether and how the data should cache:
If you are using cache with your requests, enter a value in seconds for the Cache Expiration – after this period the cache will be considered invalid and subsequent Run API Request Actions will fetch data from the API, ignoring any cache stored.
Your cache expiration will reset whenever new data is fetched and stored. Cache modes are not recommended for requests retrieving sensitive data, as the cache is stored in the app’s sandbox and is therefore subject to the security settings on the user device. If you want to gain a more intuitive sense of how the cache modes work in practice, you may find it helpful to open the Network Log while running your requests to see when they do/don’t fetch from the API. Each of your app pages also has a Network Connection Changed Event you can detect. Dropsource does not cap the amount of offline cache you can store – this is managed by the user device. |
|
How does Dropsource work with APIs?
Dropsource connects to APIs via Swagger / OpenAPI specifications. You can upload a Swagger specification documenting your API endpoints straight into your Dropsource project. Dropsource will then build requests to your external data based on your specification. For more check out Connecting to External Data.
|
|
What API formats are supported?
Your API should be uploaded as an OpenAPI (formerly Swagger) version 2.0 specification file. If you don’t currently have a specification file but do have an API, you can generate a spec file – see Data and Dropsource for tips.
|
|
What if I don’t have an API yet?
If you don’t have an API, you can try out the dynamic data functionality in Dropsource using one of our demo APIs. Open the API tab on the right of the editor and click the plus
|
|
What is Swagger?
OpenAPI (formerly known as Swagger) is a standard for describing REST APIs. An OpenAPI specification file outlines the endpoints and data models an API provides access to. By uploading a spec file to your Dropsource app, you can connect the Elements and inputs in your project to your external data, and see the results when you run the app. See Data and Dropsource for more info.
|
|
What is a Data Source?
Any arrays in your API responses will be listed in Dropsource as Data Sources. Data Sources can only be bound to dynamic Elementshelp that can contain repeating child Elements. Add a single child Elementhelp inside one of these, and you can bind the fields in your Data Source to their child Elements (e.g. a Text View inside a Table Cell). See Displaying Array Data for more.
|
|
What is an API?
An API is a service that makes data accessible to applications. For example, if you have a web database storing data relevant to your mobile app, you can create a REST API that allows the app to perform operations on the data, such as retrieving or updating it. An API provides endpoints for accessing data. Your application uses requests such as GET, POST, PUT, PATCH, and DELETE to interact with and manage the data via these API endpoints. For example, if you want to retrieve data via an API, you will typically use a GET request, sometimes passing information to specify the data your app requires. The API will respond with the data requested, which your app can then process and display to the user. Any APIs you want to use in a Dropsource project must return the data formatted as JSON. To connect your API to Dropsource, you need to document it using the Swagger / OpenAPI specification (version 2.0). This is a standard way of describing the endpoints in an API, and Dropsource uses it to build requests to your data source. The API specification you upload into Dropsource should also be formatted as JSON. See Data and Dropsource for an overview of using API data in your app. |
|
Which API authentication methods can I use?
Dropsource supports the following API authentication methods:
Different authentication flows are available within OAuth, varying in the level of trust between client and server. Each flow has specific requirements for connecting, authenticating (identifying the user), and authorizing (verifying that the user has required access permissions for the operation). Dropsource currently supports OAuth2 Password, but not OAuth2 Implicit. You can use Device Variables to store authentication data such as a username and password entered by the user, an API key, or an authentication token received from an API request. You can then select the Device Variable(s) using the Auth control in the API tab. You need to specify your auth scheme in the security section of your OpenAPI / Swagger specification file before uploading it into Dropsource. For detailed steps to including your auth detail in a specification file and configuring your auth setup in Dropsource, see the following tutorials: |
|
Which Elements can connect to API data?
You can bind your API request parameters and responses to Elements with text and number values, such as Text Fields, Sliders, and so on. If your API response includes an array, you will see it in the editor as a Data Source, which can be bound to a dynamic Elementhelp that can contain repeating child Elements. Once the Data Source is bound, you can bind the fields inside it to the child Elements of a contained Cell, Tile, or View.
|
|
Why can I still see a route / field I deleted from my API?
When you update an API, any deleted routes or fields will still show in the API tab, but with a red outline. Any parameter or response fields you had bound to input sources or Elements will still show their previous assignment. This gives you an opportunity to use this as a reference when connecting the new version of your API to your app.
|
|
Why isn’t my API data updating?
If you are using a cache mode in your Run API Request Action bear in mind that the app will only fetch new data from your backend in cases where there is no valid cache (i.e. the cache has not yet been fetched or has expired) or you are using Cache and Fetch or Force mode. Use the Network Log to see when the app is actually making a request to the API instead of using the data already cached locally.
|
|
Why isn’t my request running?
To run a request you have added to a page in your app, you need to use an Action. Decide when you want the request to run – for example, it could run when the user taps a button, or as soon as a page loads. Select the relevant Element or page in your app and open Properties > Events, adding an Action to your chosen Event. Add the Run API Request Action, selecting the request.
If your request doesn’t do what you expected it to, check out our troubleshooting guide. |
|
Why are my dynamic Element contents changing style?
If you are using Actions to set styling on the content of a dynamic child Elementhelp, you may find that the style is not maintained when API data loads into the Element. This is because the iOS operating system reuses the Elements for performance reasons. To preserve the style you want to display in these Elements, use the Prepare For Reuse Event to set your chosen styling based on your app logic (for example using If Else and/or Set Value Actions referencing the data values bound to the Element via the Data Source container).
 |
|
How can I tell what my API is returning?
You can use the Network Activity Log to access information about your API requests when they run in the Dropsource editor. This allows you to establish the status code being returned from a request and to access the data it’s returning, including headers and body. Check out Connecting to an API for an overview, and if you’re having problems with a request try our troubleshooting guide.
|


App Functionality and Data
|
What is an Event?
Your app can detect different types of Event that occur during execution – lifecycle Events such as a page loading or the app launching, the user interacting with an Element, and an API response being received. App lifecycle Events are on the left of the editor – for any other Event, select an Element, page, or API request and open (Properties > Events), then add an Action that will execute when the relevant Event occurs. See Defining Functionality for more.
|
|
Where do I carry out setup tasks for my app?
You can respond to app lifecycle Events including the app being launched. Open the Lifecycle drawer on the left of the editor. Add Actions to the Application Launched Event – for example, using the Set Value Action to initialize variables, or the Change Landing Page Action to show an particular page on launch.
|
|
What’s the difference between Device and Page Variables?
Device Variables are globally accessible – you can get and set them from any page in your app. A Page Variable is only accessible inside the page in which it is declared – you can use Page Variables to pass data values around the app. When you set a value on a Device Variable, the value will persist between app sessions. See Managing App Data for more.
|
|
How do I respond to user interaction with an Element?
Select an Element on the Canvas and open Properties > Events. You will see a list of Events your app can respond to, including taps, values changing, and more. Add an Action to your chosen Event, choosing functionality to execute when that Event occurs. See User Interaction for more.
|
|
How do I check user input?
You can access user input values in the Actions you add to your app. If you need to validate what the user has entered to determine your app’s behavior, you can do so using conditional processing with the If Else Action.
|
|
What do I use Device Variables for?
Device Variables are for local storage values that you can reference throughout the pages in your app. These are stored on the user device. You can set the value of a variable using the Set Value Action. You can access the value of a variable in both Action and API fields. See Managing App Data for more.
|
|
How do I access a Page Variable value?
You can use Page Variables in Actions and API requests. Any relevant Actions will include a Page Variables container when you make a selection for a field. To pass a Page Variable to a request, select it for a field in the Parameters section.
|
|
What do I use Page Variables for?
You can use Page Variables for any data items that you either only need to access within a single page, or that you need to pass from one page to another. To pass a Page Variable from one page to another, add it to the target page and check Is required during inbound navigation – when you create a Go To Page Action from another page and select the target page, you will be prompted to pass the value. See Managing App Data for more.
|
|
Can I use local storage instead of an API?
You can use Device and Page Variables to store simple values. Anything more structured requires an API. Your app can also cache API request data locally and use it when device network connectivity is not available. See Data and Dropsource for more.
|
|
How do I check the value of a variable?
You can test the value of a variable using an Action. Select an Element, page, or request, and open (Properties > Events). Choose an Event and add an action, selecting the If Else Action. Test the value of a variable by selecting it in the first field, then choosing a comparison operator, and entering a second argument, which can be a static type value that you enter explicitly, or can come from the input sources in the app. Add Actions to execute on a true or false result of the test.
|
|
How do I respond to the user changing the value of an Element?
Select the Element on the Canvas or Element Tree and open Properties > Events. You will see an Event representing the user changing the value, typically it will be Value Changed. Add an Action to respond to the Event.
|
|
Where do I carry out clean up tasks when the user leaves the app / a page?
Your app can detect the user leaving a page, allowing you to carry out any necessary actions. Select the page on the Canvas or Element Tree and open Properties > Events. Add an Action to the Page Left Event to implement whatever functionality you need.
|
|
How do I hide and show Elements?
You can toggle Element visibility using the Set Value Action. Add the Action to an Event (for example the user tapping a button, or a page loading). Select the Element you want to set visible or hidden using the Elements container – choose the Hidden property, then enter a static boolean true or false for the second argument.
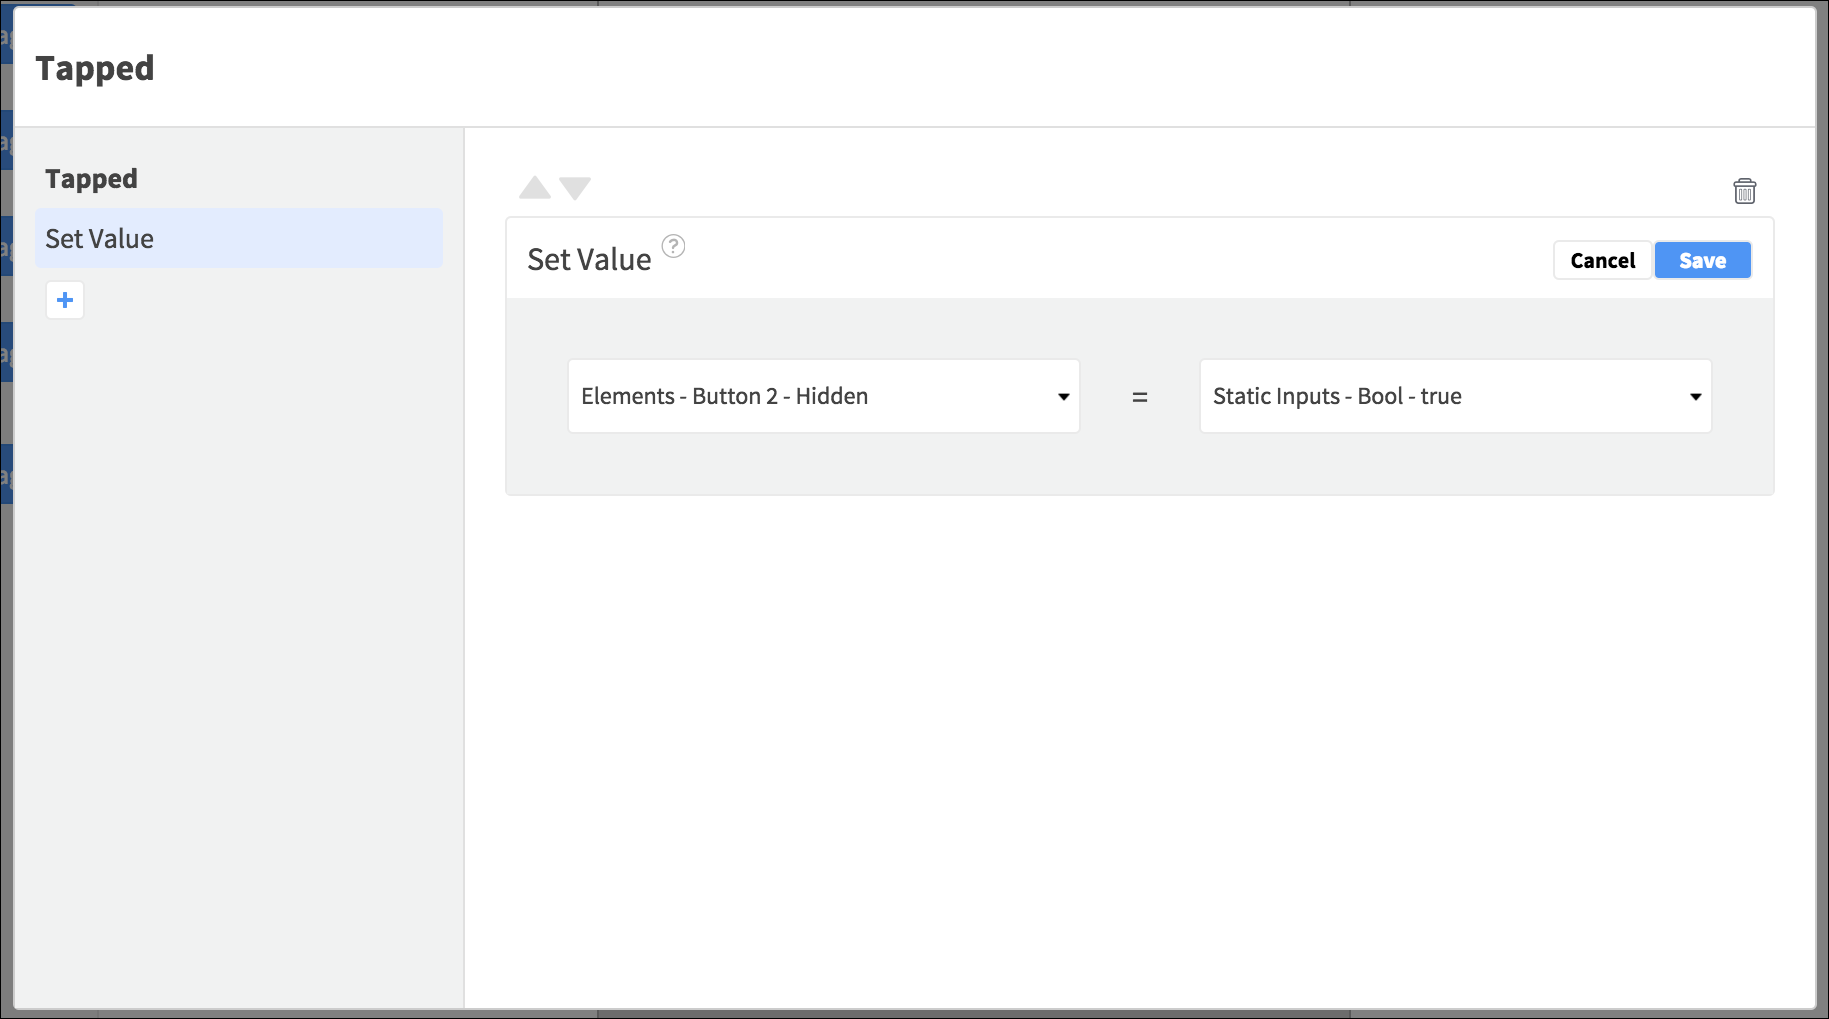 To alternate an Element’s visibility, check out the Toggle Element Visibility tutorial. |
|
How do I disable Elements dynamically?
You can enable and disable Element interactivity while your app runs. Use the Set Value Actions to set boolean true or false values on the Element Enabled or User Interaction Enabled properties. See the Toggle User Interaction On and Off tutorial for a walkthrough.
|
|
How do I add logic to my app?
You can build logic into your app functionality by adding Actions that will execute when a particular Event occurs, with more complex control flows using Actions with nested Events. The If Else Action allows you to execute Actions depending on the results of a conditional test. Similarly, the Actions to Show Alerts and Request Location Updates allow you to specify Actions to execute on nested Events.
|
|
Can I import a Google Sheet into Dropsource as my data source?
It is not currently possible to connect to Google Sheets in Dropsource, so you will need to serve your data from another source via REST API.
|
|
Can I import an RSS feed instead of an API?
You can currently only connect external data to Dropsource using an API. If you are able to expose REST endpoints for your data to return JSON outlined in an OpenAPI (formerly Swagger) specification, you will be able to use it in your app. See Data and Dropsource for more guidance.
|
|
What if I can’t see the Action I need?
If you can’t see the Action you need you may be able to achieve your desired functionality using a plugin. Get in touch help@dropsource.com. If that isn’t an option you may be able to add the functionality to your downloaded source code, but be aware that if you edit the code you will not be able to include your changes in your Dropsource project, which will therefore become out of sync with the downloaded version of your app.
|
|
What information can I access from the user device?
Your app can access native information and functionality including location data. You can also import files from the user device or any cloud providers they use. You can send data to other apps including the camera, gallery, text message, phone dialer, web browser, and email app.
|
|
Which data types can I use?
You can create variables and simple objects of standard Swift / Java types, as well as for any APIs you have imported into your project. However, for structured data you will need to use an API.
|
|
Why can’t I make the selection I need?
The Context Selector presents the input sources in your app within various top-level containers. Depending on the task you’re carrying out, it will allow you to enter values manually, to select variables, Elements, pages, and data from API requests / app Events. If you can’t see the value you need, it isn’t a valid selection for your operation.
|
|
How do I create an onboarding screen for my app?
You can show information only the first time an app runs using the page On Load Event together with a Device Variable – see Create an Onboarding Screen for a detailed walkthrough of the steps.
|
|
How do I access the user’s location?
To access the user location on iOS, you first need to request their permission using the Request Location Authorization Action – on Android the permissions request will happen automatically when your app attempts to access location data. You can request single or continuous updates. The location update Actions include nested Events in which you can retrieve the location information from the Event Data container.
Make sure your app has received a valid location update before you attempt to build the user location into your functionality, as location updates can take several minutes to be received. |
|
How can I calculate distance between locations?
Use the Calculate Distance Action to determine the distance between two location variables (
CLLocationManager on iOS,
LatLng on Android).

You can then access the distance in the Action Data container within the same Event scope.
For example, to calculate the distance a user travels during a period of time, create two location Device Variables, and use Request Location Update or Start Updating Location to set their values as your app runs, then use the Calculate Distance Action to determine how far the user has moved. You can find the closest location from an array in an API request Event. |
|
How do I set the map display area?
Use the Set Visible Map Region to show a particular area in a Map Element. Use a CLLocationManager variable on iOS and specify coordinates either statically or using LatLng type on Android.
Note that certain mapping Actions need to execute after the map has initially loaded, so if you find that your app build fails or it crashes while running, try removing mapping Actions from earlier Events, such as page load or resume. |
|
How do I show directions between locations?
You can open the device maps app to show the user directions between locations specified in your app logic. Add the Open Maps App for Directions Action, specifying the start and end locations as
LatLng (Android) or
CLLocation (iOS) values.
|
|
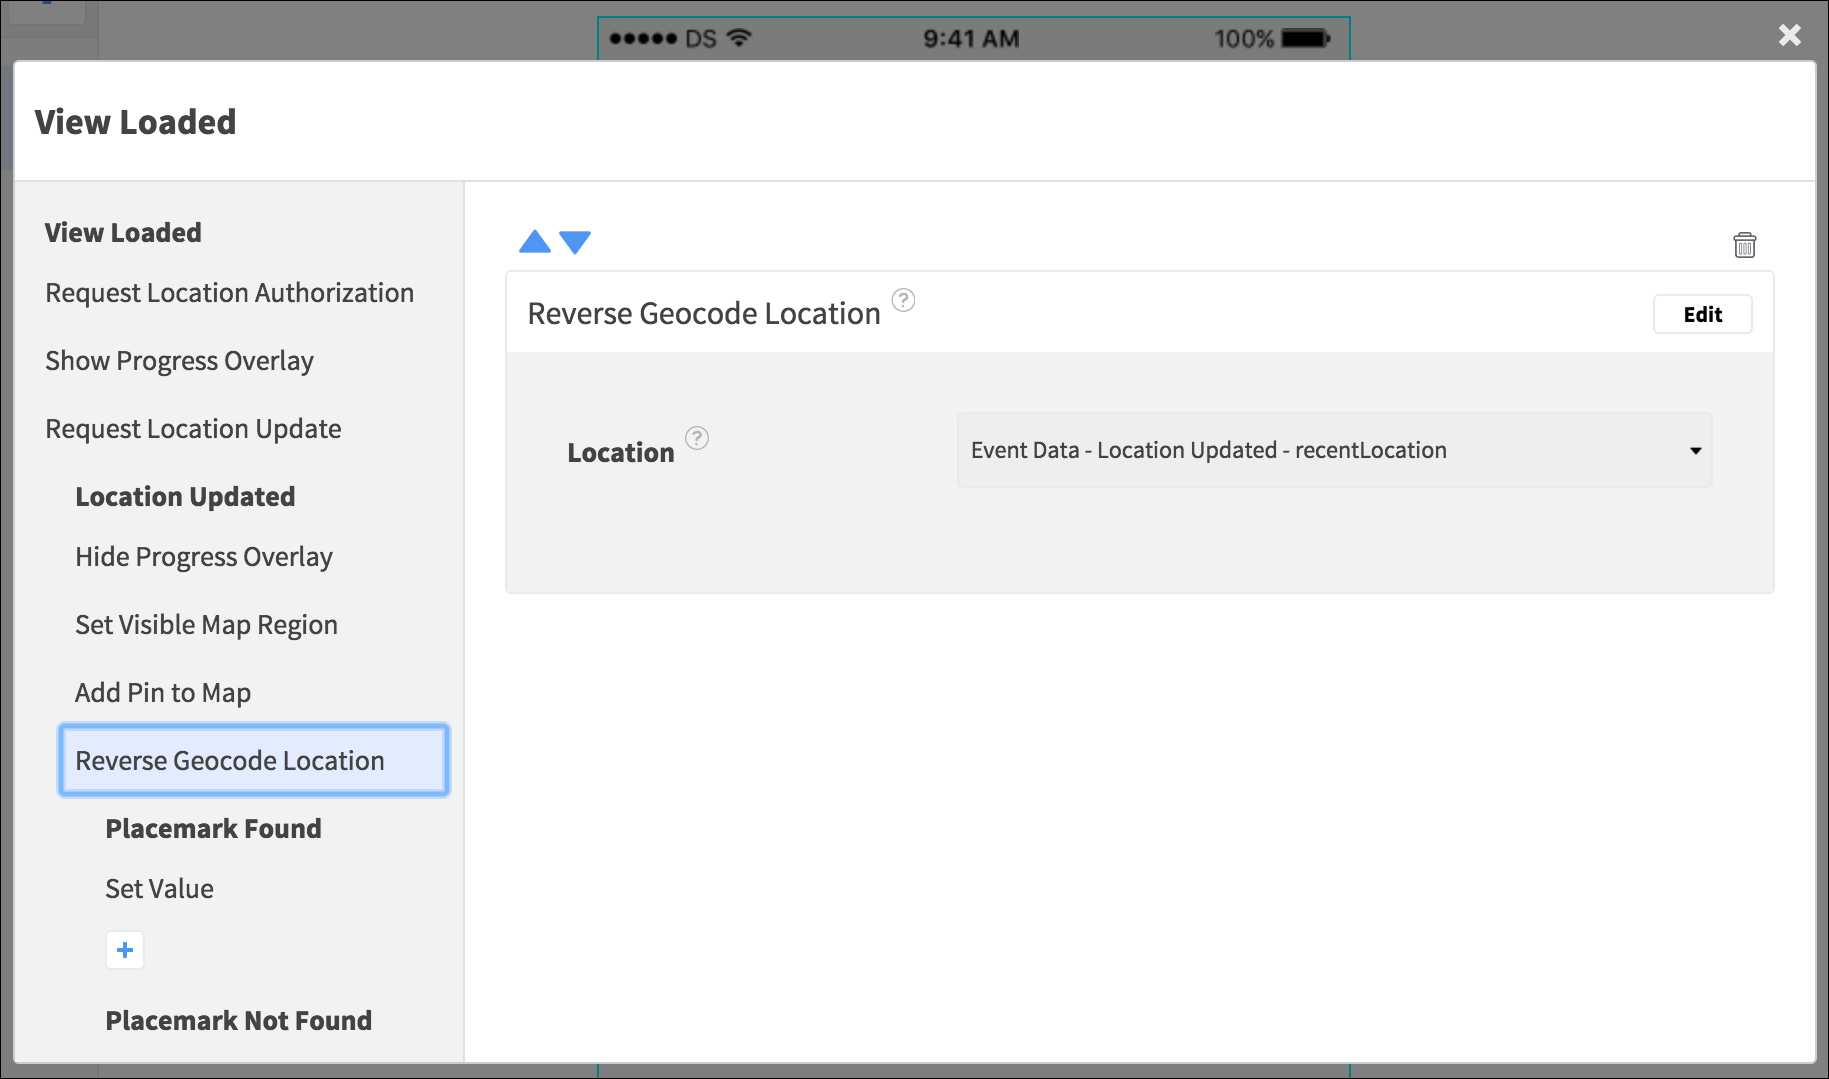
How do I find information about a location on a map?
You can use Reverse Geocode Location to find readable data about a location that you can then build into your app UI, for example on the Long Pressed Event for a Map Element or a Location Updated Event.
|
|
How do I know where the user tapped on a map?
Use the Map Element Long Pressed Event to access the location tapped by the user. Any Actions you add there can access the location data using the Event Data container, via the touchLocation, including coordinates.
To find out about a pin tapped by the user, select the Annotation View Selected Event and use the Event Data container, selecting the view.
|
|
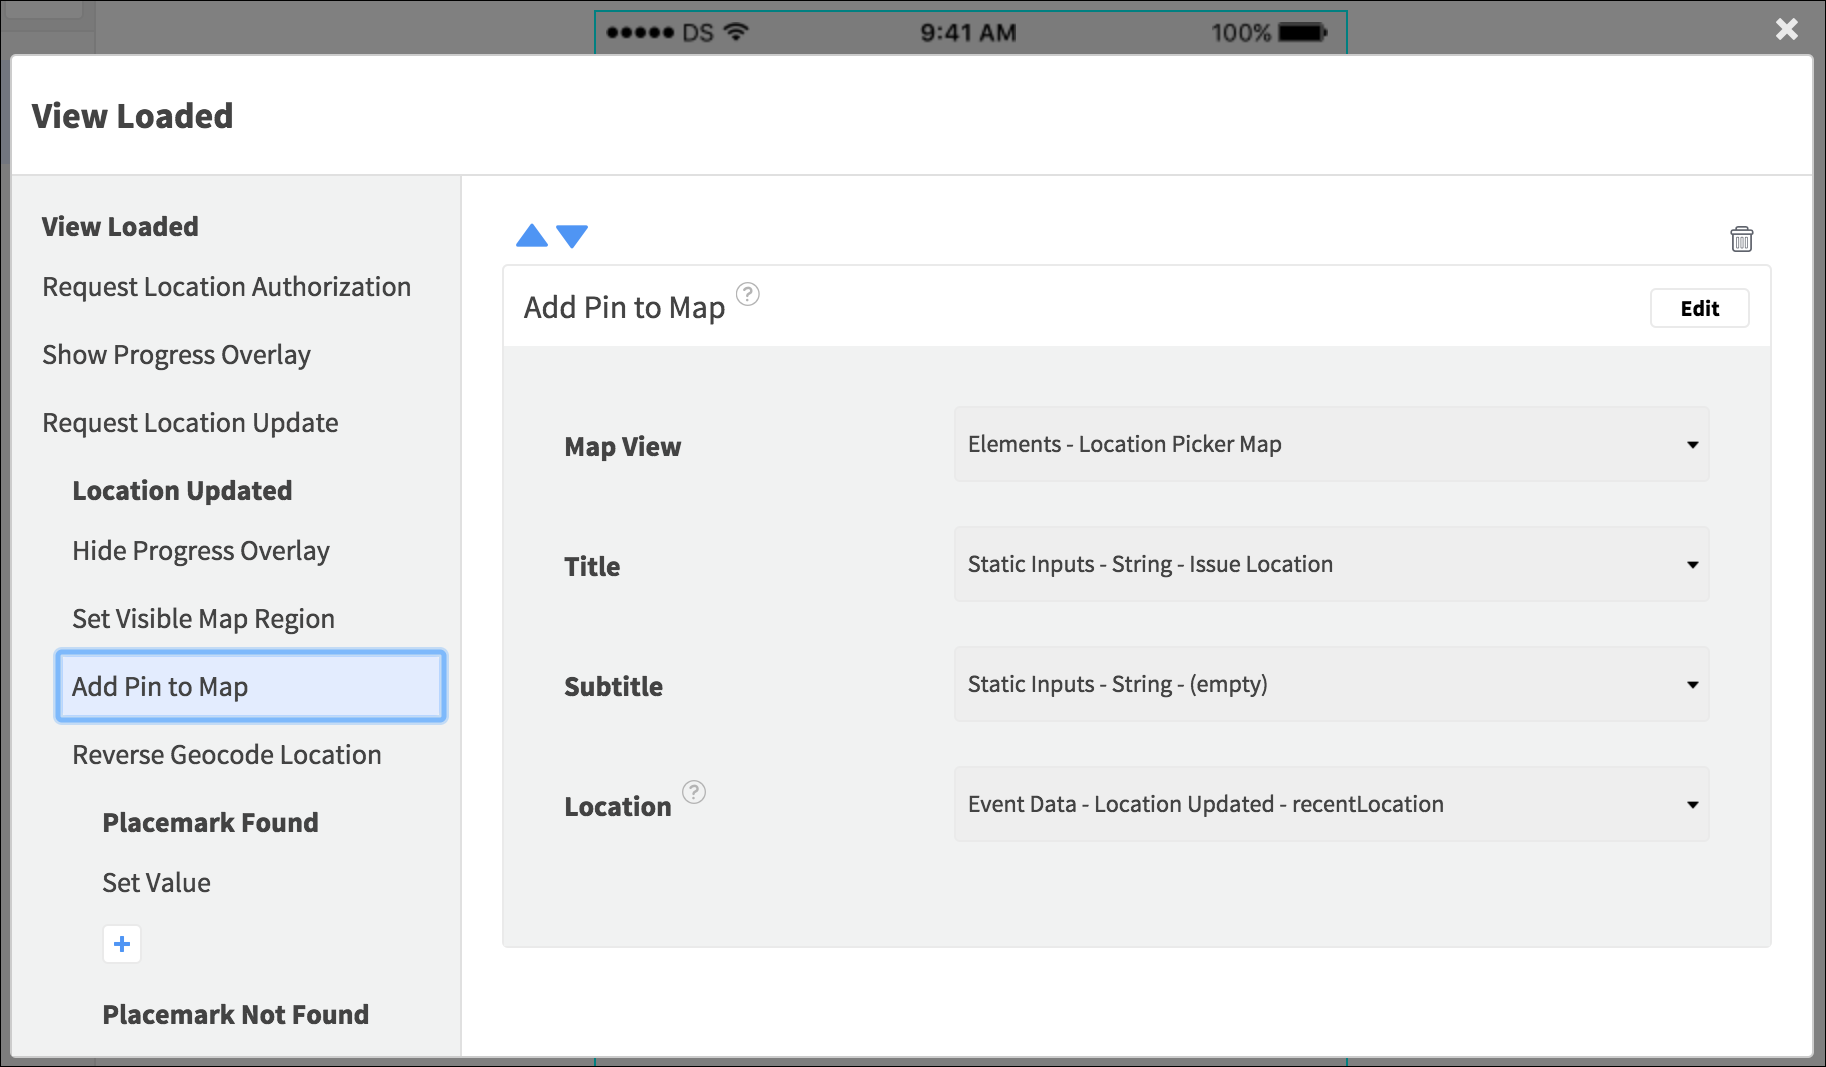
How do I highlight a location on a map?
You can use the Add Pin to Map (iOS) / Create Marker (Android) Actions to annotate a particular location on a Map Element. Enter text to display at the specified coordinates, which you can pull from the input sources in your app. For example, to add a pin showing the user location, use the Action in the nested Location Updated Event. To generate a location from latitude and longitude, use the Create a Location Object Action on iOS or the Create a LatLng Object Action on Android. You can show multiple locations from an API array using request Events.
|
|
How do I use notifications in my app?
You cannot currently create notifications in your Dropsource project, but you can receive and respond to notifications sent using a service such as Apple Push Notification service or Firebase Cloud Messaging.
|
|
How do I carry out timed functionality?
You can use the Start Timer (Android) and Create Timer (iOS) Actions to carry out other Actions at set intervals. Add the timer Action to an Event, and in the nested Tick Event, add any Actions you want to execute at the specified interval, for example updating the UI.
|
|
How do I access the date picked by the user?
If you’re using the Date Picker Element on iOS or the Show a Date Picker Action on Android, you can access the selected date to use in your app.
On iOS, select the Date Picker and open Properties > Events, choosing the Value Changed Event. You can access the date via the Event Data container in Actions you add here, for example using the Format Date to String Action. On Android, add the Show a Date / Time Picker Action to an Event – in the nested Date Picked Event, use the Event Data container to access the selected date, for example with the Create Date from Parts and Format Date to String Actions. |
|
How do I process a payment?
Add the Accept Payment Using PayPal (iOS) / Obtain Immediate PayPal Payment (Android) Action to an Event in your app. Enter the amount you are charging the user, a currency code, and a short description of what the charge is for.
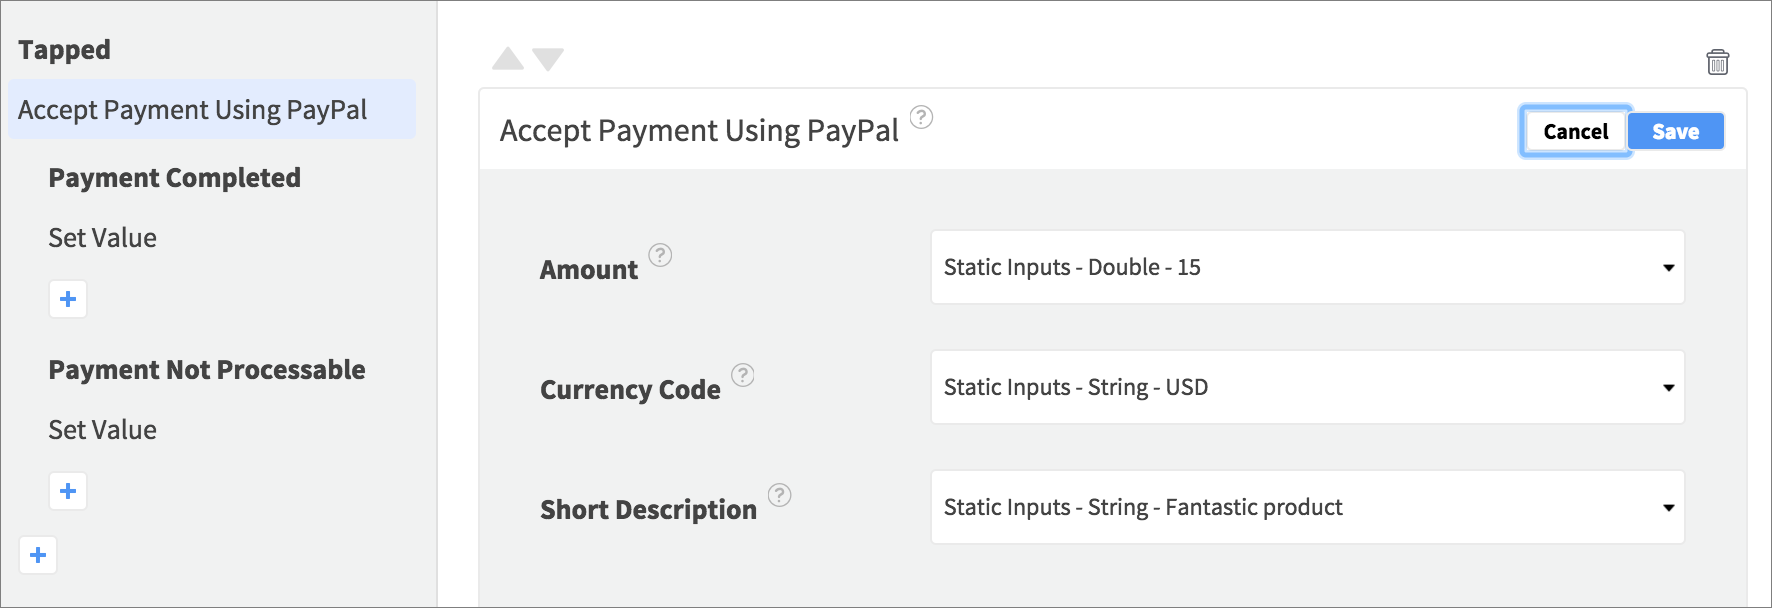 Use the nested Events to respond to success or failure of the charge. For a more detailed overview, see the Process a Payment with PayPal tutorial. |
|
What analytics can I access about my app?
You can use AWS and Firebase Analytics in your app. Dropsource provides Actions to create and record events, and to add attributes and metrics to events.
|
|
How do I log analytics information with AWS?
To log an Amazon Web Services Analytics Event, carry out the following steps:
|
|
How do I log analytics information with Firebase?
To log a Firebase Analytics Event, first use the Create Empty Bundle Action. This will return a Bundle object you can access in subsequent actions in the same Event via the Action Data (or save to a variable if you want to access it in other Events). Next use the Add Entry to Bundle Action to add data to your Bundle. Finally use the Submit Firebase Analytics Event Action to submit your analytics data to Firebase.
|
|
How do I calculate travel time?
Add the Determine Travel Time (iOS) / Calculate Distance and Travel Duration (Android) Action to an Event in your app. For the Source and Destination inputs you will need Location / LatLng objects, so depending on your app you may need to use Actions to create these first, then reference them in your travel time Action via the Action Data. Specify measurement and transportation options as required, and access the calculated values in the nested success and failure Events via the Event Data.
 For a more detailed overview, see the tutorial on calculating travel time to a location. |
|
How do I authenticate with Touch ID?
Add the Authenticate with Touch ID Action (iOS only) to an Event in your app. Enter a reason to display the user when they are prompted to authenticate, and respond to successful or failed auth in the nested Events.
|
|
Can I chat with my app users?
You can provide user support in your app using Intercom. Dropsource provides Actions to register users and communicate with them via an Intercom chat bubble.
 To use the Intercom Actions, create an app in Intercom and copy the App ID and API Key for each platform – you’ll find them in App Settings > Installation > iOS / Android. Paste the relevant ID and key into the Dropsource editor for your app using Settings > Intercom (note that the key values are different for iOS / Android).  See Chat with the User via Intercom for an overview of setting chat up in both Intercom and Dropsource. |
|
How do I create an event in the user’s calendar?
You can use the Add Event to Calendar Action to specify the details for a new calendar event on the user’s account, for example with iOS or Google. Enter values for the event title, description, and date, any of which you can pull from the input sources in your app or enter manually.
 Respond to the status of event creation in the nested Success and Failure Events – you can access the event identifier or error detail in these via the Event Data container. |
|
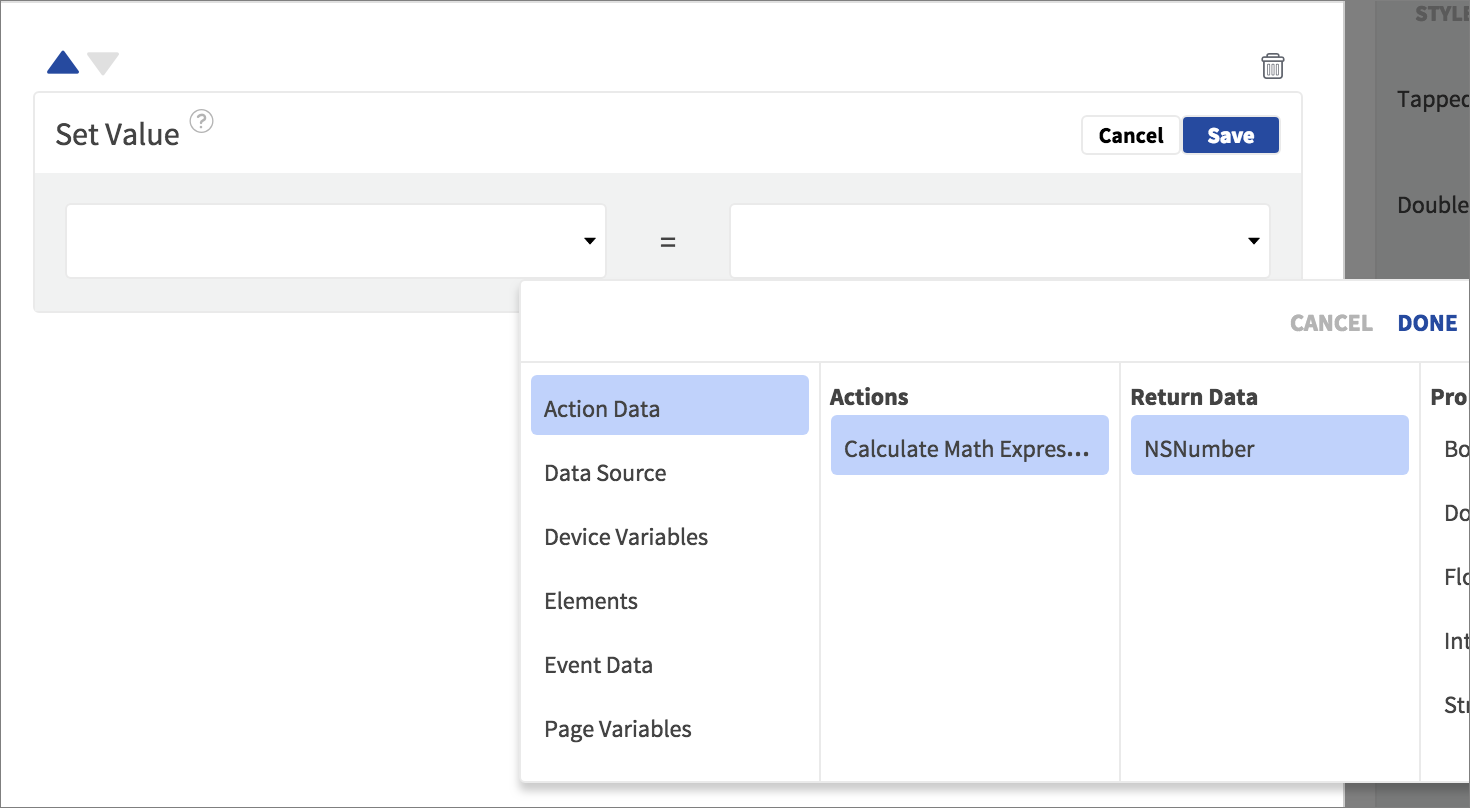
How do I add numbers?
You can add number values in your app with the Calculate Math Expression Action – you can use this to carry out a variety of arithmetic calculations. In the Action, add a Number Variable for each number you want to include in the calculation, entering a name (which you’ll use to refer to the variable inside the Action only), and selecting an input source to assign it a value (for example to use a value from a Page / Device Variable, a UI Element, an API response field, or a static value entered manually). In the Expression field, include your math calculation formula and refer to the variables you created by name (e.g. price+postage ).
To increment, just enter a variable for the value you want to add to, and include its name followed by +1 in the formula. (Use -1 to decrement.) You can use the calculation result in other Actions you add to the same Event in your app, via the Action Data.
Your app can use the same process to carry out other calculations, including subtraction ( - ), multiplication ( * ), division ( / ) , modulus ( % ), and power ( ^ ). You can also use brackets in your formula, for example you could represent a total price for something being sold at a 50% discount as: (price+postage+service)/2.
|
|
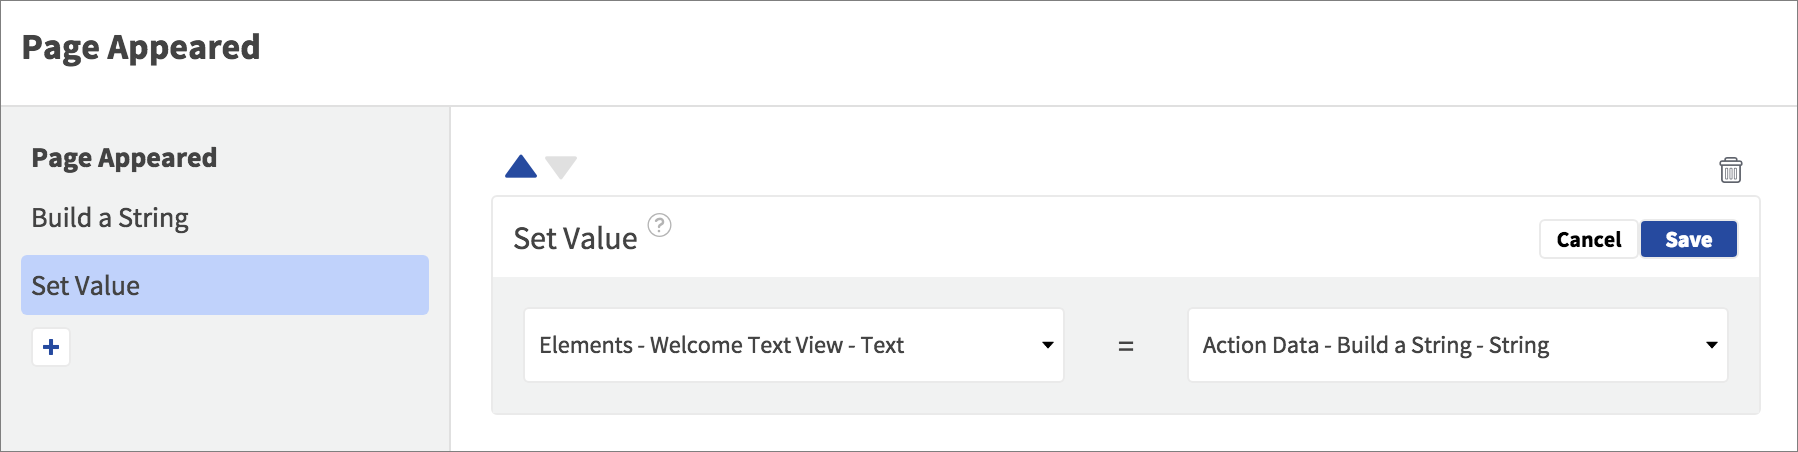
How do I add two pieces of text together?
You can concatenate text strings in your app using the Build a String Action. Add Variables to represent the two pieces of text you want to combine, choosing an input source for each (these can come from anywhere in your app, including API responses, variables, and user input via your UI Elements, or you can enter them into the Action manually as static values). In the String Template field, refer to your variables using their names surrounded by double curly braces (e.g. {{first_name}}) and add any other text you need, such as spaces, punctuation, or other characters.
You can then access the resulting combined text string via the Action Data in any other Actions you add to the same Event, for example to display the new string in a text Element in the page.
|
|
How do I process strings in my app?
You can interpolate text strings in your app using the Build a String Action. Enter a Template that can include string literals along with placeholders indicated in your Variables list, referencing each variable by a name you assign it surrounded by two sets of curly braces (e.g.
{{first_name}}). You can assign a value to each variable from the available input sources in your app. See Selecting Action Inputs for more on Actions with dynamic inputs.
|
|
Why is my template or expression highlighted in red?
When you enter a Template into the Build a String Action or an Expression into the Calculate Math Expression Action, the Dropsource editor will highlight your entry to validate it as you type it. You can refer to variables in both Actions – create your variables in the lower part of the Action and then refer to them in the template/expression by name (enclosed in curly braces for the string Action). You cannot refer directly to variables you have already created in your app, such as Device and Page Variables, but you can refer to these by creating a local variable in the Action and pulling the value from the Page or Device Variable you need (or from any other input source in your app that is available within your chosen Event). If you refer to a variable that you have not yet created, you will see red highlighting to indicate an error, but it will change to blue once your variable is in place.
 
|


Running and Testing
|
How do I launch my app to an app store?
To launch your app to an app store you can download the source code and import it into an IDE before exporting it for release – check out Publishing your App for guidance. To download your source code, select a build from Builds and choose Deploy this Build.
|
|
How do I run my app on a device?
To run your app on a physical device use the configurations button next to Test and select Mobile Device, then Save.
Click the Test button to initiate a mobile device build. You will receive an email containing a link to the app and instructions on how to download and install it on your mobile device. See Testing your app for more. |
|
How do I scan a barcode?
Add the Capture Barcode (iOS) / Scan a Barcode (Android) Action to an Event in your app. Select display settings such as informational text (depending on your platform) and access the scanned barcode info via the Event Data in the nested Captured Event.
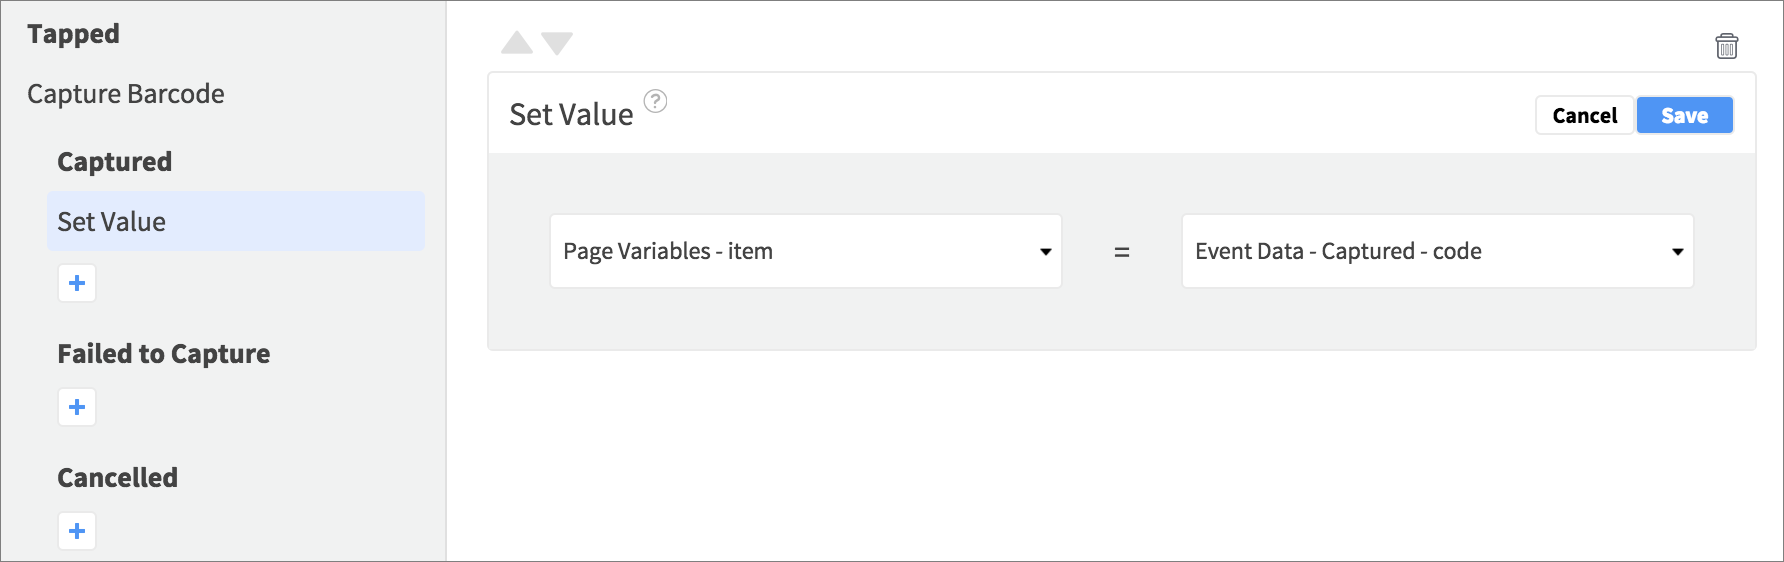 For more detail check out the Scan a Barcode tutorial. |
|
How do I take a photo?
Add the Select Image from Photos with
Camera selected as the Image Source (iOS) or the Take a Photo (Android) Action to an Event in your app.
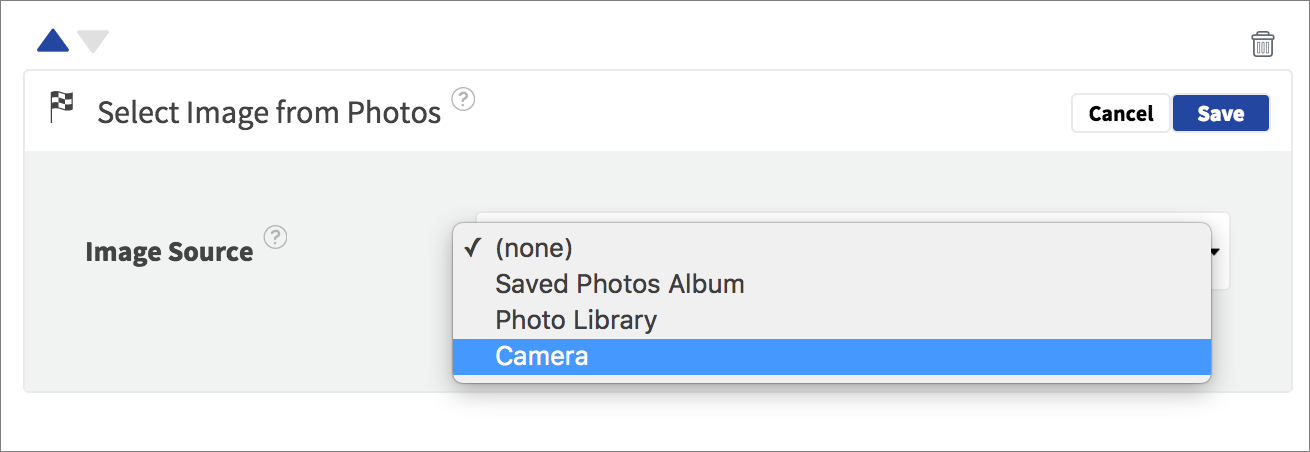 Use the Event Data in the nested Image Chosen / Photo Captured Event to access the photo, for example to display it in an Image Element. 
|
|
How do I test my app?
You can test your app by running it in on the web simulator in the browser, installing it on a mobile device, or downloading the source code and running it in an IDE. Use the Test button at the top right of the editor to initiate a build on your selected configuration (web simulator or mobile device). Use the test configuration drop-down on the right of the Test button to select a configuration.
Once you have builds available, they will appear in Builds – from here you can launch on the web simulator, or choose a deployment option.
With a Dropsource Enterprise account you can also launch your app to beta testing services. |
|
How do I share my app for feedback?
You can share your app prototype with others by link, email, or social media. Create a new build using the Test button, then in Builds open the app in the simulator. You’ll see buttons next to the virtual device to copy the link or share it to particular platforms.
Your prototype is fully interactive, and can display dynamic data. However, any native functionality such as location will not simulate in the virtual device, so to demonstrate that you will need to install the app on a mobile device. See Testing your App for more detail. |
|
How do I remove Dropsource branding from the sharable prototype?
To remove Dropsource branding from your sharable prototype page, upgrade that specific project to a source code license.
|
|
What can I do if I get a build error?
If your app fails to build, check any Errors on the right of the editor and take steps to address them before attempting to build again. If you are still unsure what has caused the issue, check the changes you made since your last build. If you can’t identify the problem, you can access help via the Help button in the editor.
|
|
What is happening when I click the test button?
When you click Test, Dropsource initiates a build. It writes the source code for your app based on what you have set up in the editor, then compiles that code into an executable app. This process can take a couple of minutes, and the more complex your app gets the longer it will take, because the platform is translating your project into the algorithms and Java/Swift code for a native app on your chosen platform. Once your build is complete, you will see it in the Builds list – from that point on you can launch it onto the Web Simulator, download the source code, or test the app on a mobile device.
|
|
Why can’t I build my app?
If you see a notification indicating that your build could not be initiated, this may be due to your project experiencing too many build fails, which can create issues in the Dropsource system. If this happens please make a change to your project before trying to build it again, for example by removing a recent change you made since your last successful build, or contact support via the forum for help troubleshooting your project.
|
|
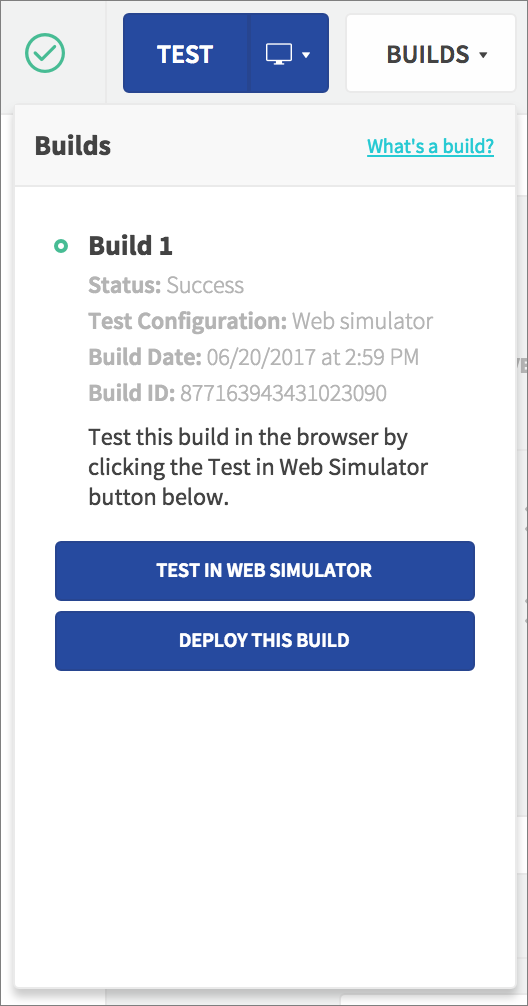
What’s a build?
When you click the Test button, Dropsource creates a build of your app. This involves writing native source code representing the current state of your project in the editor, and compiling it to run on the Web Simulator or a Mobile Device.
Once a build is complete, you will see it in the Builds list. From there you can test or deploy the app. Each build in the list represents your app at one point in time, including the date and time, a unique build ID, and the test configuration targeted (Web Simulator or Mobile Device).
This allows you to make changes to your app and still access its behavior / appearance for previous builds, which you can continue to test, download, or deploy. |
|
Where’s my source code?
You can download the source code for your app using Builds on the top right of the editor. Select Deploy this Build for the relevant build of your app, then choose Download Source Code. See Accessing your Source Code for more info.
|
|
Why can’t the Action I’m using simulate in the browser?
The Appetize simulator can demonstrate most of the functionality in a typical app, but there are certain tasks that you can only test on a physical device. This is also the case when you use an IDE such as Xcode or Android Studio to develop your app – the unique hardware features in mobile devices make them impossible to fully emulate on a computer. You can test your functionality by downloading the source code for your app, importing it into an IDE and running it on a device.
|
|
Why doesn’t my app do what I expected?
There are lots of reasons your app may not function the way you expect it to. When you run the app in the browser, it runs on the Appetize simulator, which is unable to emulate certain types of functionality such as taking photos, making phone calls, and so on. For these types of Action you need to download and run your app on a physical device. If your app is crashing or you can’t get it to work the way you want it to, you can access help via the Help button in the editor.
|
|
Why doesn’t my app include the most recent changes when I run it?
Each time you make a change and want to run your app you need to build it again using the Test button. You can run any build from the Builds list, but Dropsource will only create a build when you click Test.
|
|
Why doesn’t my source code include my most recent changes?
Each time you make a change and want to download your source code, you need to build the app again using the Test button. You can download the source code for any build from the Builds list but Dropsource will only create a build when you click Test.
|
|
Why won’t my app run?
If your project has errors that will prevent it from building you will see them in the Errors at the top right of the editor, and will receive an error message when you attempt to run the app. Once you have addressed each of the errors, attempt to build again. If you need help, contact support via the forum and we’ll help you to figure it out.
|
|
How do I unzip my downloaded source code?
The archive file you download from Dropsource should open using the default extractor applications on most operating systems. However, if you’re on Windows, you may encounter issues unzipping your files in cases where your file names are long due to components in your app having long names. To successfully unarchive your files, please try a third party extractor such as 7-Zip instead of the default Windows application.
|


Using Dropsource
|
Why can’t I use my chosen name for a page, element, or variable?
Dropsource validates the names you enter for pages, elements, and variables – according to the following rules:
|
||||||
|
Why isn’t my project saving?
Dropsource auto-saves your work – you will see the save status at the top of the editor:
Closing your browser or ending your session will not normally disrupt the saving process. Refreshing your browser will normally clear any saving issues, although you may occasionally lose some of your work when a save is not successful. If saving fails you will see a notification:
|