You can present content to your users when the app launches. This allows you to support app onboarding or provide information that you only want the user to see once.
- If you haven’t already done so, create a page in your app, using the plus
 button in the Pages drawer on the left of the editor.
- The first page you create is automatically set as the app landing page, so if your app has more than one page already, make sure the page you want your users to see first is set as the landing page, using the
 button in the Pages drawer.
- The first page you create is automatically set as the app landing page, so if your app has more than one page already, make sure the page you want your users to see first is set as the landing page, using the
- Add a second page to your app – this will be the page your users see after the landing page on launch of the app, and the first page they see otherwise.
- In Variables on the left of the editor, click the plus button to add a new Device Variable to the app. Name the variable “onboard”, and choose a
Java /
Swift >
Boolean type. Save the variable.

- Click the landing page in Pages to open it. Add the onboarding content that you want users to see when the app launches. Include an interactive Element that will allow users to navigate away from the onboarding content, for example a Button / Text Button with its Text property set to “OK”.
- Select the Button (or other interactive Element) and open Properties > Events on the right of the editor. Select the Tapped Event.
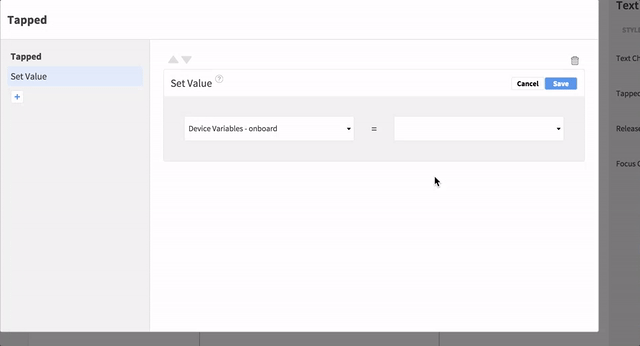
- Click the plus button to add an Action – choose Set Value. Edit the Action.
- In the first input, select the Boolean variable you created.
- In the second input, select a Static Input Boolean value of
True. Save the Action.
- Click the plus button again to add another Action – choose Go To Page this time. Edit the Action.
- Select the page you want users to see after the onboarding page, and choose a transition. Save the Action and close the modal window.
- Click the plus
- Select the landing page, either by clicking it on the Canvas or in the Element Tree on the right of the editor (it’s the parent Element).
- Open Properties > Events to add functionality to the page lifecycle.
- Click Add/Manage for the On Load Event.
- Click the plus button to add an Action, choosing If Else. Edit the Action.
- In the first input, select the Boolean variable you created.

- In the second input, select a Static Input Boolean value of
True. Save the Action.

- In the first input, select the Boolean variable you created.
- Click the plus button under the True Event, and add a Go To Page Action. Edit the Action.

- Select the page you want the users to see when the app launches and they have already seen the onboarding content. Choose a transition and Save the Action.
- Add content to the page you’re showing users after the onboarding content.
Your app will now show the onboarding page when the user launches the app, and will navigate to a different page every other time. Swipe Elements such as View Pagers / Page Controllers are particularly well suited to onboarding screens with multiple sections in them.