In this tutorial series you are rebuilding the GitHub Example App. Last time you displayed issue comments, this time you will allow the user to add and edit issues and comments, as well as deleting comments.


The app will use one page to add and edit issues, and another to add and edit comments.
Edit Issues
Add a new page to the app, selecting the Nav Bar config on iOS, no config on Android – and naming it “Edit Issue”.
The page will be used for both adding and editing issues, so the pages navigating here will need to pass the relevant data. Add the following Page Variables on the right of the editor:
- “number” – Int / Integer
- “owner” – String
- “repo” – String
- “title” – String
- “body” – String
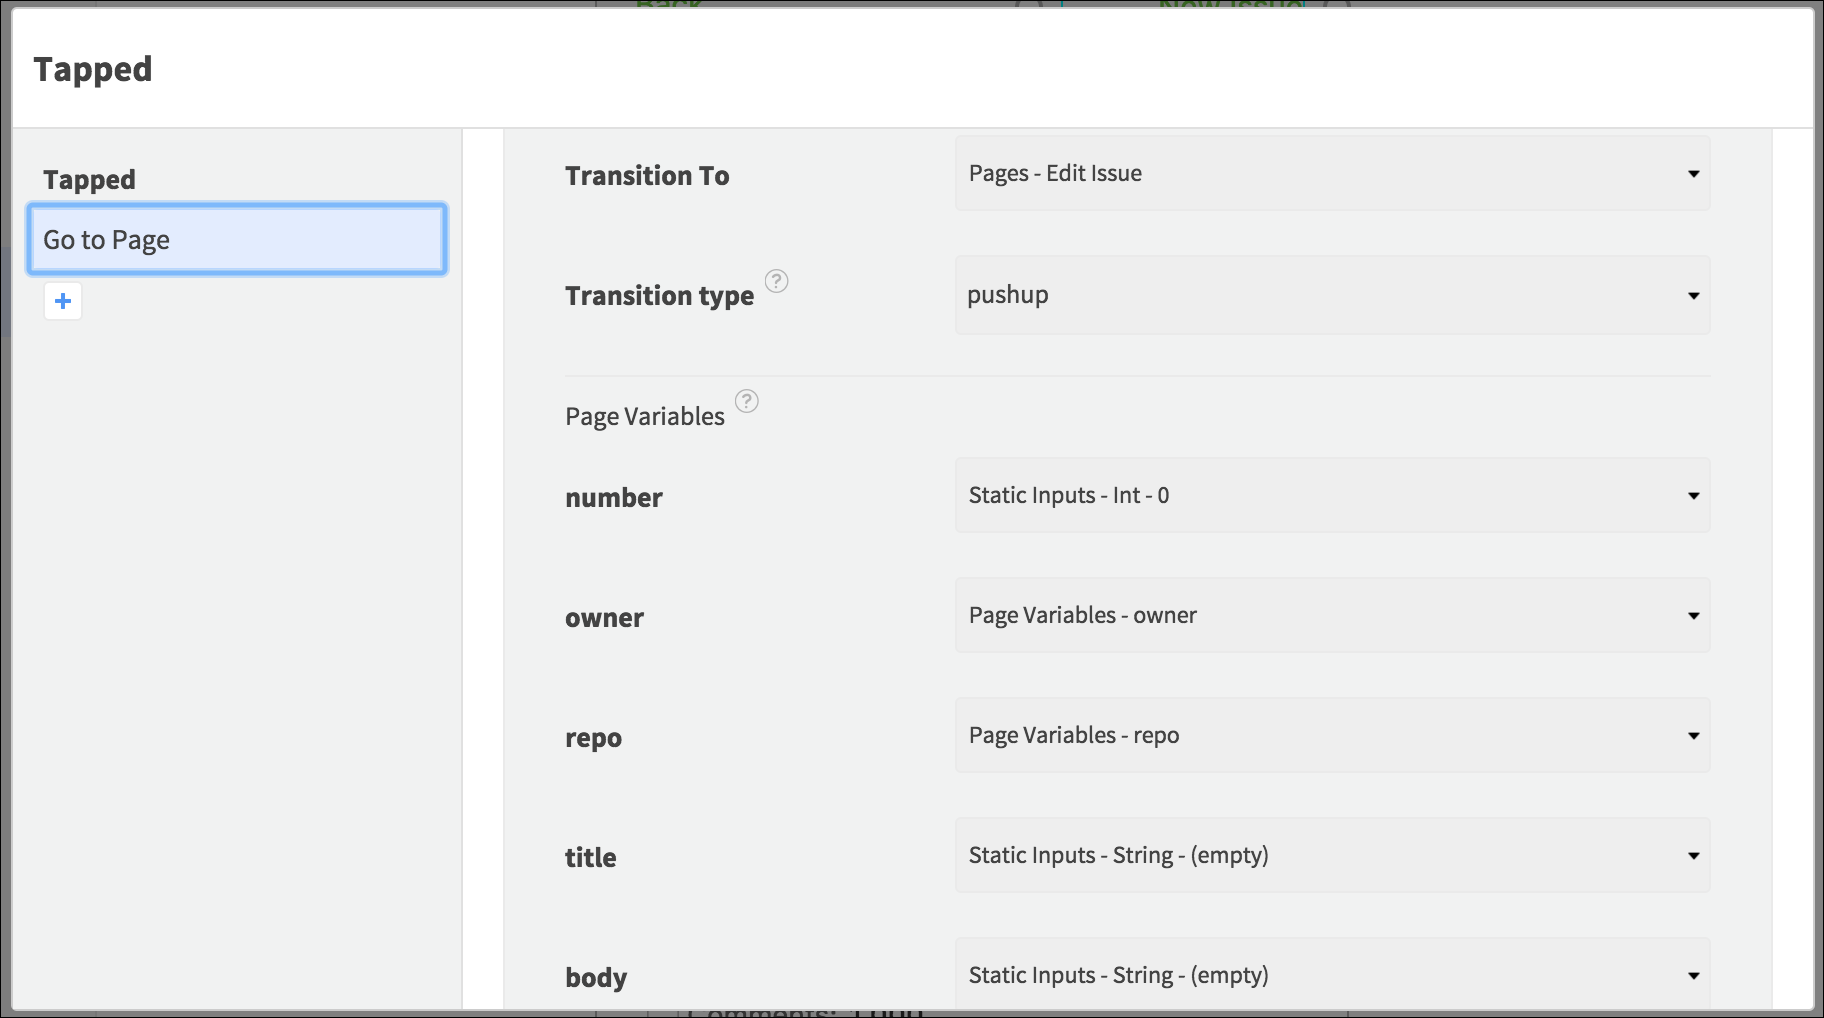
Back in the Issues page, select the New Issue Button and open its Tapped Event. Add a Go To Page Action, selecting the Edit Issue page and the pushup transition. For the Page Variables, pass the owner and repo variables forward – for the number field enter a static Int value of 0, and for the title and body variables enter empty Strings.
Open the Edit Issue page again.
- On iOS select the page on the Canvas and in Properties, set the Navigation Item Title to “Edit Issue”. Check Enabled for both the Left and Right Navigation Item settings, entering “Save” for the Right, and “Back” for the Left.
- On Android add a View named “Header View” to group the navigation items at the top of the page. Inside it add a “Back” Button on the left, a “Save” Button on the right, and a Text View named “Title Text View” under them in the center, displaying “Edit Issue”.
Add a View at the top of the remaining space named “Title View”, with enough space to display a couple of lines of text. Add a Text Field inside it, naming it “Title Text Field”, setting the Placeholder to “Issue Title”.

Add another View to fill the remainder of the page height, naming it “Body View”. Leave a small gap between it and the View above, and set a background color on the page if you want to indicate the space between them.
- On iOS, inside the Body View add two Text Views – named “Placeholder Text View” and “Issue Body Text View”, setting the Placeholder Text View to occupy a single line of text at the top of the View, displaying “Start typing your issue here…”.
- On Android add a single Text Field named “Issue Body Text Field”, setting its Hint to “Start typing your issue here…”.
Position the Issue Body Text Element to occupy most of the View, covering the placeholder on iOS as well as the area below it, and with a transparent background. Set its Text empty.
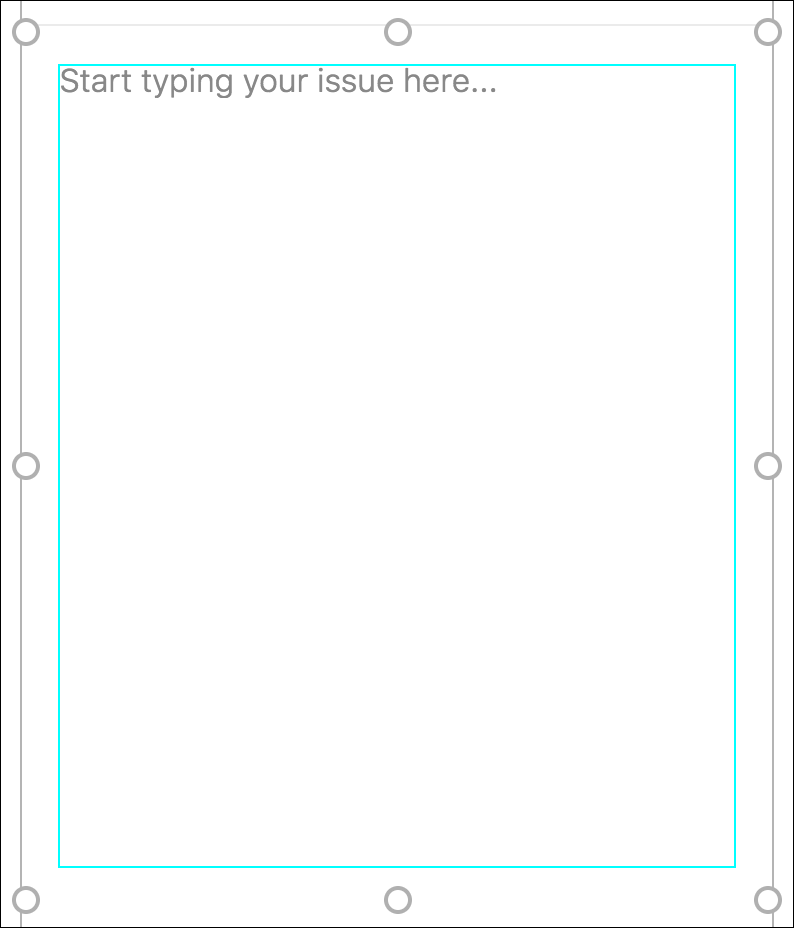
Your page should look something like this:

Build Edit Issue Requests
In the API tab, add two endpoints:
- POST /repos/{owner}/{repo}/issues
- PATCH /repos/{owner}/{repo}/issues/{number}
Open the POST request and select the Path Parameters. Bind the owner and repo fields to their corresponding Page Variables. In the Body Parameters, bind the body field to the Issue Body Text View, and the title field to the Title Text Field. In the Events, open the 401 Event and add a Go To Page Action navigating to the Login page. In the 201 Event, add a Go Back a Page Action (selecting true on iOS).
Open the PATCH request and select the Path Parameters. Bind the owner, number, and repo fields to their corresponding Page Variables. In the Body Parameters, bind the body field to the Issue Body Text View, and the title field to the Title Text Field. In the Events, open the 401 Event and add a Go To Page Action navigating to the Login page. In the 200 Event, add a Go Back a Page Action (selecting true on iOS).
Edit Comments
Create another page, choosing the same config as the Edit Issue page, naming this one “Edit Comment”.

On iOS set the same page Element Navigation Bar Item properties as the Edit Issue page, but with Edit Comment as the Title. On Android add the same header Elements as the Edit Issue page: a “Header View” with a Back Button, Save Button, and Title Text View – set the Text View Text to “Edit Comment” this time.
Add Page Variables to the Edit Comment page:
- “number” – Int / Integer
- “owner” – String
- “repo” – String
- “body” – String
- “id” – String
Back in the Comments page, select the New Comment Button and add a Go To Page Action to its Tapped Event, selecting the Edit Comment page and pushup transition. For the Page Variables, pass the owner, repo, and number variables forward, and pass empty Strings for the id and body variables.
In the Edit Comment page, add two Text Views on iOS again – “Placeholder Text View” and “Comment Body Text View”, on Android just one Text Field named “Comment Body Text Field”. Set the Placeholder text Element Text (iOS) / Comment Body Text Hint (Android) to “Start typing your comment here…” and make it occupy a single line. Scale the Comment Body text Element to occupy most of the page, with an empty Text property on iOS.
The page should look something like this:

Build Edit Comment Requests
In the API tab, add two requests:
- POST /repos/{owner}/{repo}/issues/{number}/comments
- PATCH /repos/{owner}/{repo}/issues/comments/{id}
Open the POST request, and select Path in the Parameters list. Pass the number, owner, and repo fields their corresponding Page Variables. Select Body from the drop-down list and bind the body field to the Comment Body Text View.
- In the request Events, add a Go To Page Action to the 401 Event, navigating to the Login page. Add a Go Back a Page Action to the 201 Event (selecting true on iOS).
Now open the PATCH request Parameters. Select Path from the list, and bind the id, owner, and repo fields to their corresponding Page Variables. Select Body from the list and bind the body field to the Comment Body Text View.
- In the request Events, add a Go To Page Action to the 401 Event, navigating to the Login page. Add a Go Back a Page Action to the 200 Event (selecting true on iOS).
Add Issue Edit Functionality
Back in the Issues page, select the Menu Button and open its Tapped Event. Add a Show Alert / Show Alert Dialog Action. Set the Title to “Issue Actions” and the Message to “Pick an action to perform”. On iOS select Action Sheet Style and add two buttons: “Edit Issue” and “Cancel”. On Android set the Positive Label to “Edit Issue”, and the Neutral Label to “Cancel”. In the nested Event for Edit Issue pressed / Positive Button pressed, add a Go To Page Action, selecting the Edit Issue page, and a fade transition. For the Page Variables, use the following selections:
- For number select Data Source - Issue Page Controller / View Pager - Response /repos/{owner}/{repo}/issues 200 Data TypeItem - Number.
- For owner and repo select the two Page Variables passed to this page.
- For title select the Text property of the Issue Title text Element.
- For body select the Text property of the Issue Body text Element.


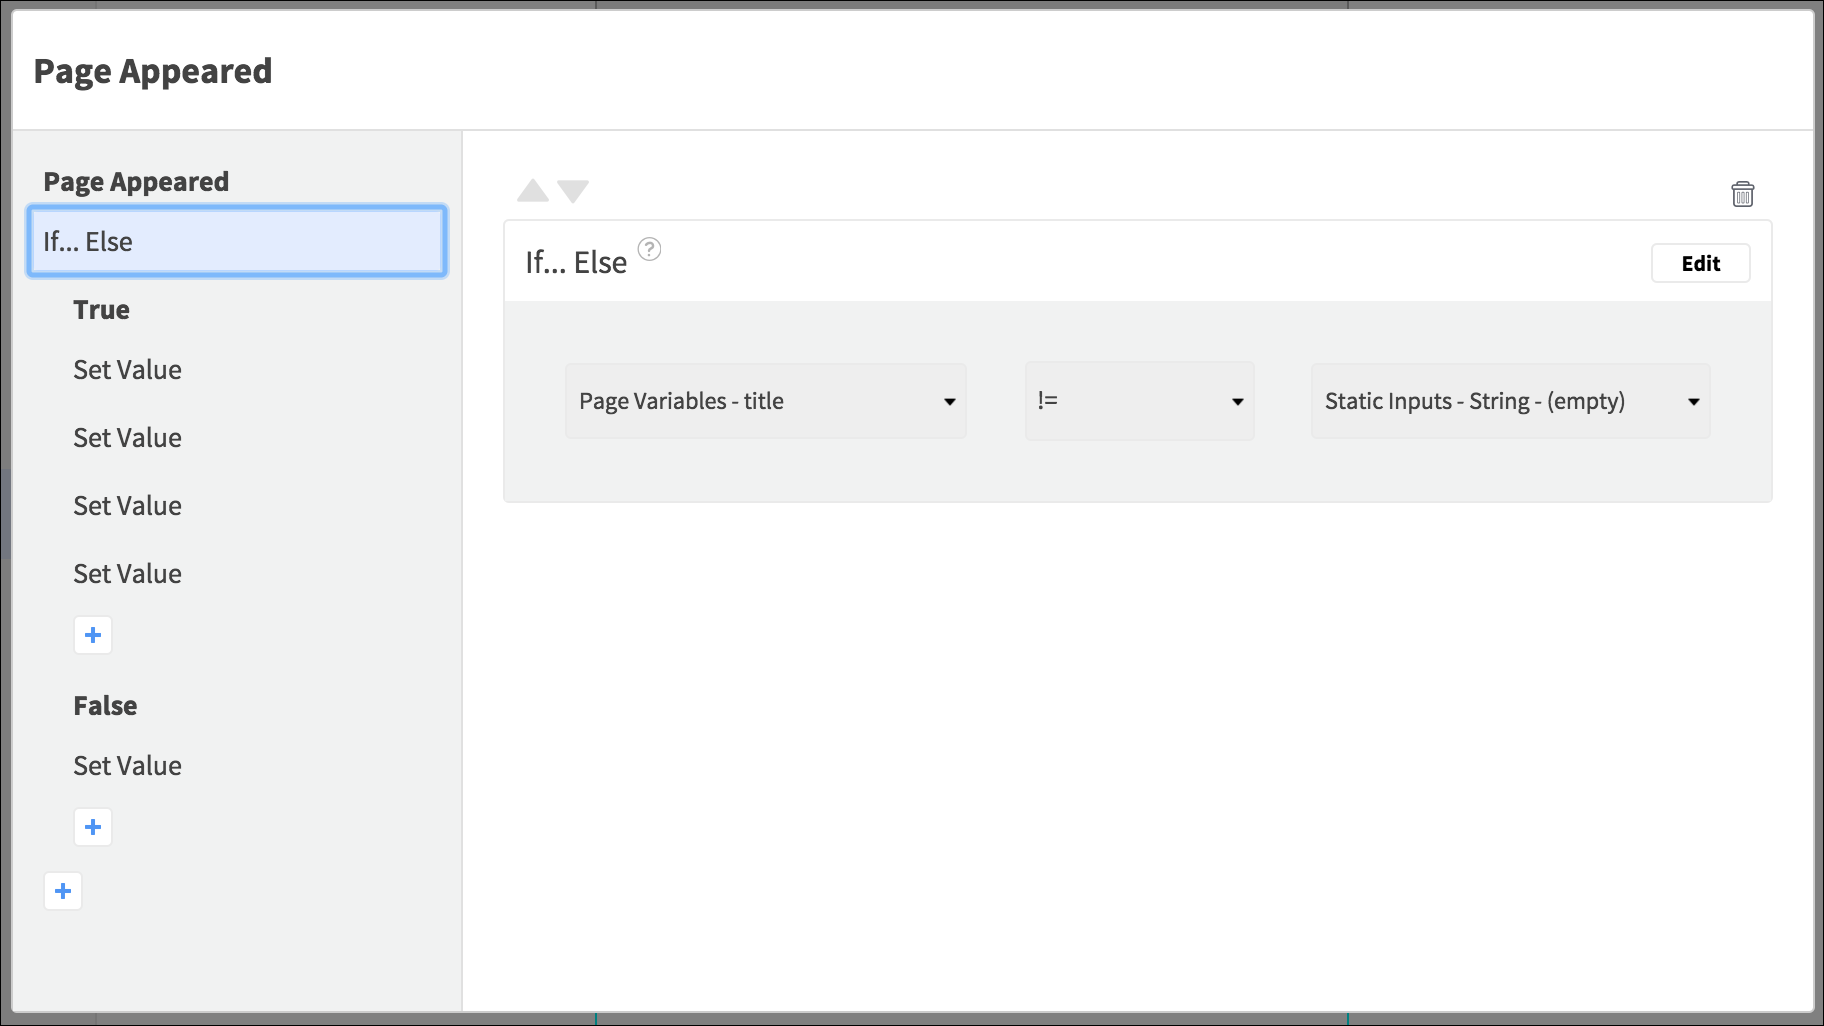
Now you can add functionality to the Edit Issue page. Select the page in the Element Tree and open the Appeared / Resume Event. The app will navigate here for both adding and editing issues, so you need to check which of those the user is attempting. Add an If Else Action, checking whether the body Page Variable is not equal to an empty String. In the True Event, add the following Set Value Actions:
- Set the Navigation Bar Title (iOS) / Title Text View Text (Android) to the static input String “Edit Issue”.
- Set the Title Text Field Text to the title Page Variable.
- Set the Issue Body Text Element Text to the body Page Variable.
- Set the iOS Placeholder Text View Hidden property to true.
Add a Set Value Action to the False Event, setting the Navigation Bar Title (iOS) / Title Text View Text (Android) to “Add Issue”.
On iOS, the app should also hide the placeholder when the user starts to enter text, so select the Issue Body Text View Element on the Canvas and add the same Set Value Action to its Focused Event, setting the placeholder to be hidden.
Select the page Element again and this time manage the taps on the Nav Bar items (iOS) / the Header View Buttons (Android). In the Left Bar Item Tapped / Back Button Tapped Event, add a Go Back a Page Action (selecting true on iOS).
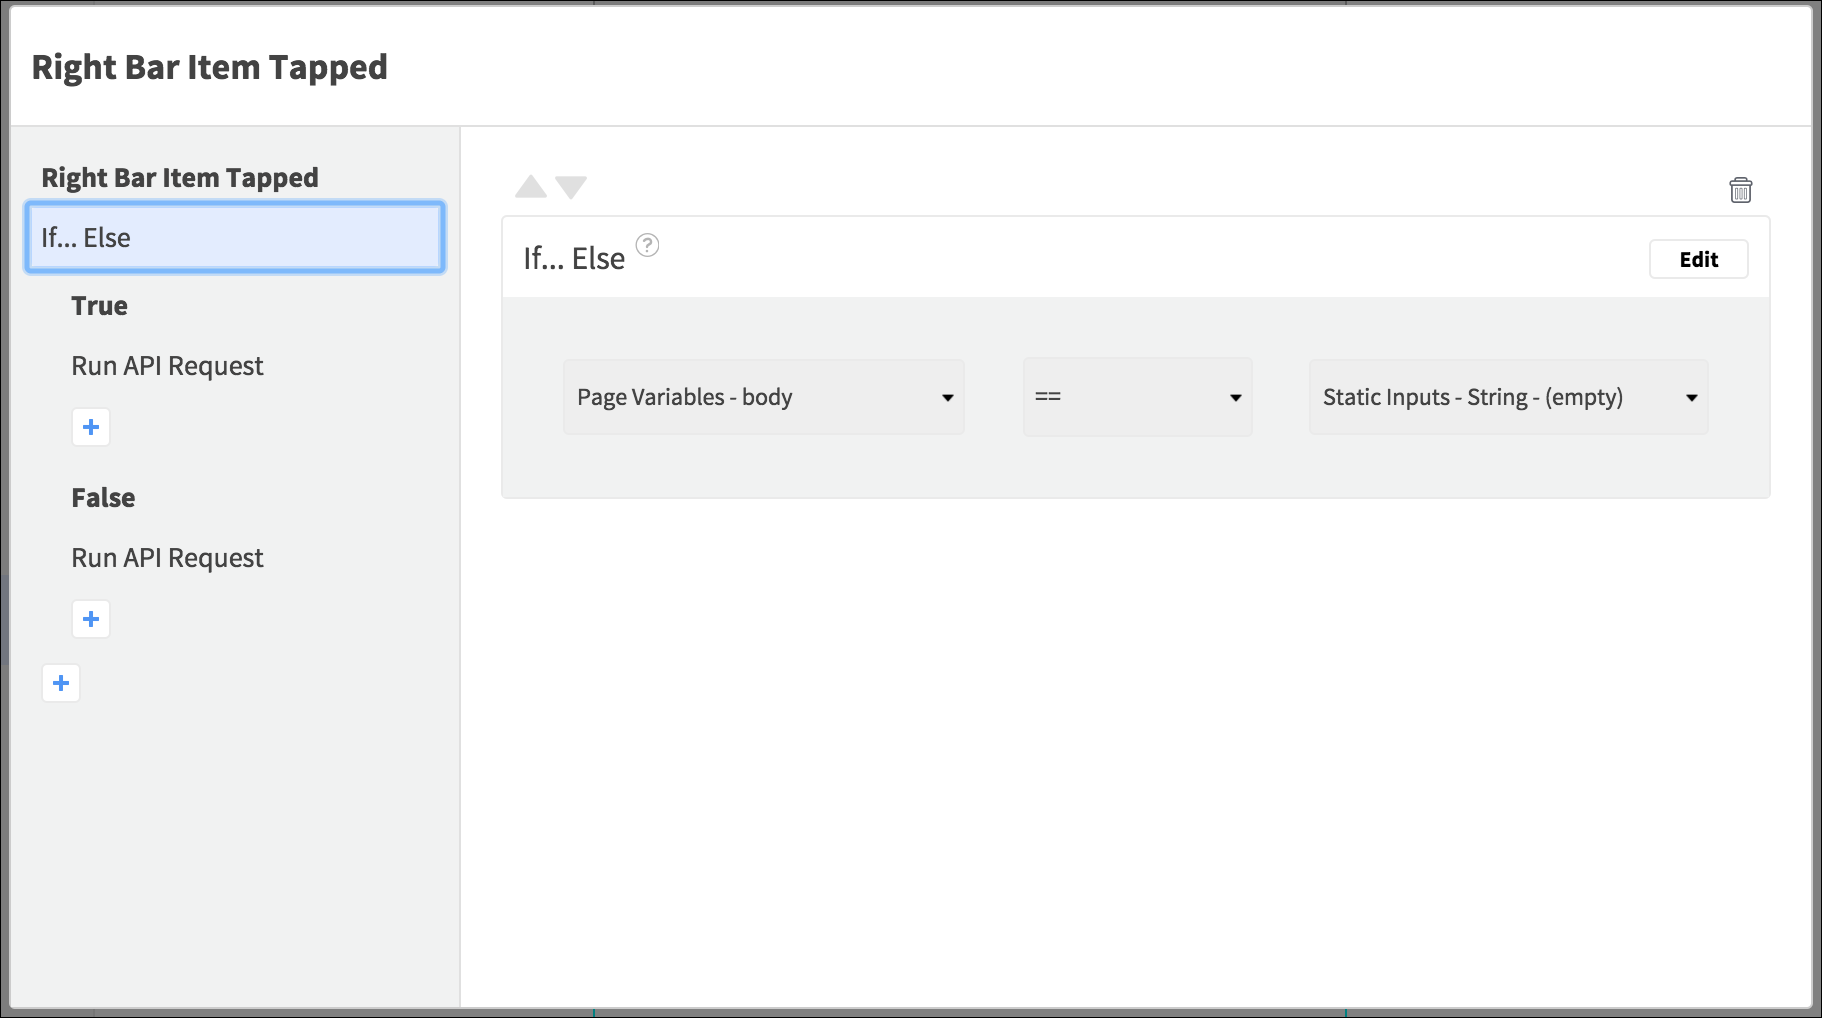
Next add some Actions to the Right Bar Item Tapped / Save Button Tapped Event:
- If Else checking if the
body Page Variable is
equal to an empty String.
- In the True Event, add a Run API Request Action, selecting the POST request.
- In the False Event, add a Run API Request Action, selecting the PATCH request.
Add Comment Edit Functionality
In the Comments page API tab, add a DELETE /repos/{owner}/{repo}/issues/comments/{id} request. Open the request and select Path from the Parameters list. For the owner and repo fields, pass the corresponding Page Variables. For the id field, retrieve the ID for the selected comment from the Data Source container.

In the request Events, add a Go To Page Action to the 401 Event, navigating to the Login page. For the 204 deleted Event, add a Go To Previous View in Page Controller / Go To Last View in View Pager Action, selecting the Pager / Controller.
The menu for managing comments will be similar to the issue options, but the user will also be able to delete comments.
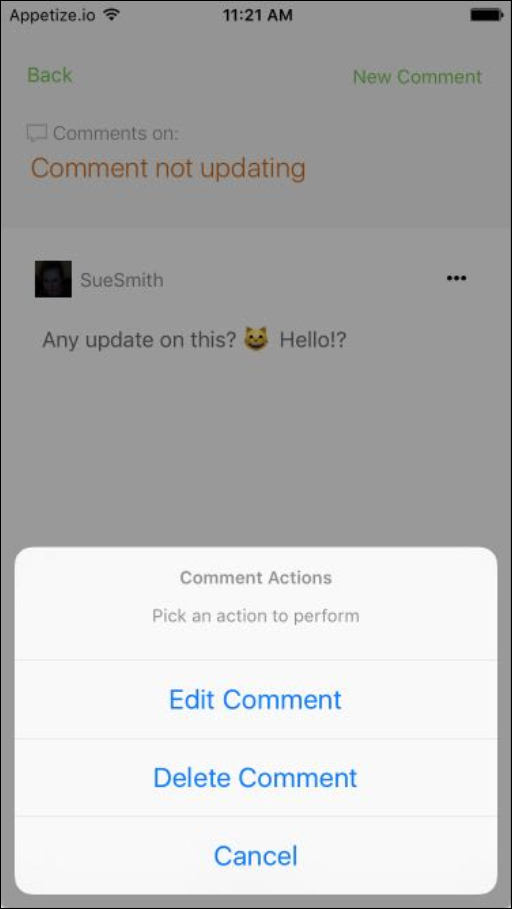

Select the Menu Button and open its Tapped Event. Add a Show Alert / Show Alert Dialog Action, setting the Title to “Comment Actions” and the Message to “Pick an action to perform”. Select Action Sheet Style on iOS and add three buttons: “Edit Comment”, “Delete Comment”, and “Cancel”. On Android set the Positive Label to “Edit Comment”, the Neutral Label to “Cancel”, and the Negative Label to “Delete Comment”.
Under the Edit Comment pressed / Positive Button pressed Event, add a Go To Page Action, selecting the Edit Comment page and pushup transition. For the Page Variables, pass:
- id the Data Source - Comment Page Controller / View Pager - Response /repos/{owner}/{repo}/issues/{number}/comments 200 Data TypeItem - Id
- owner, repo, and number, their corresponding Page Variables
- body the Comment Body Text View Text
In the Delete Comment pressed / Negative Button pressed Event, add a Show Alert / Show Snackbar Action. Set the Title to “Confirm” and the Message / Button Text to “Delete this comment?”. On iOS select Alert Style and add two buttons: “Yes” and “No”. On Android set the Duration to Indefinite.
In the Yes pressed / Button clicked Event, add a Run API Request Action, selecting the DELETE request.

Finally you can complete the Edit Comment page. Select the page in the Element Tree and open its Events. Select the Appeared / Resume Event. The page will appear for both adding and editing comments, so add an If Else Action, checking if the body Page Variable is not equal to an empty String.
In the True Event, add three Set Value Actions:
- Set the Navigation Bar Title (iOS) / Title Text View Text (Android) to “Edit Comment”.
- Set the Comment Body Text Element Text to the body Page Variable.
- On iOS set the Placeholder Text View Hidden property to True.
In the False Event, add a Set Value Action, setting the Navigation Bar Title (iOS) / Title Text View Text to “Add Comment”.
Select the page Left Bar Item Tapped (iOS) / Back Button Tapped (Android) Event and add a Go Back a Page Action (selecting true on iOS).
Select the page Right Bar Item Tapped (iOS) / Save Button Tapped (Android) Event and add an If Else Action. Check if the body Page Variable equals an empty String. In the True Event, add a Run API Request Action, selecting the POST request. In the False Event, add a Run API Request Action, selecting the PATCH request.
Test the app to see it in action! Try adding and editing issues and comments – you should see your changes in GitHub straight away.
Next Steps
Why not try extending the app to use more of the data from GitHub – the endpoints can send and receive lots of data items. You may also like to experiment with the cache mode options in your Run API Request Actions to manage network connectivity issues. You could also add to the specification file if you want to utilize more of GitHub API’s functionality – edit your JSON file and update it in the API tab to use your additions inside Dropsource.