In this tutorial series you are rebuilding the GitHub Example App. Last time you logged the user into GitHub, this time you will present a list of their repositories.
Once authenticated, the user will see a list of their repositories.

GitHub repo list on iOS / Android.
Add Repository Elements
Last time you created the Your Repositories page – now you can add Elements to it. At the top of the page, add a View Element, naming it “Header View”. Size it to occupy around one tenth of the page height, and the full width. Style its Background Color to distinguish it from the rest of the page.
Inside the View, add a Label / Text View, naming it “Repositories Title”. Center it in the View and set the Text to “Your Repositories”.

Under the View, add a Table / Dynamic List, renaming it to “Repo Table” / “Repo List”. On iOS, set the Content property to Dynamic. Set styling for the Table / List background, separator, and any other settings you like. Scale the Table / List to occupy the remainder of the page under the View.
Add a Table Cell / Dynamic List Tile, naming it “Repo Cell” / “Repo Tile”.
Inside the Cell / Tile, add a Label / Text View, naming it “Repo Name Label” / “Repo Name Text View”. Position it in the top half of the Cell / Tile, occupying most of the width but with some space on its right. Set the Text to “Repository Name” and style it bold.
To the right of the repo name text Element, add an Image, naming it “Arrow Image”. Set the Image Asset to this forward arrow image:
![]()
Scale the Image to around the same height as a line of text, with aspect scale and a transparent background.
The bottom half of the Cell / Tile will show an icon, informative label, and number each for stars, forks, and issues on the repository. Add an Image for each, a Label / Text View for each informative label, and a Label / Text View for each count number, arranging them all in a line:
- Stars
- An Image named “Star Image” with this asset:

- The text “Stars”, with the Element named “Star Label” / “Star Text View”
- The text “0”, with the Element named “Star Count Label” / “Star Count Text View”
- An Image named “Star Image” with this asset:
- Forks
- An Image named “Fork Image” with this asset:

- The text “Forks”, with the Element named “Fork Label” / “Fork Text View”
- The text “0”, with the Element named “Fork Count Label” / “Fork Count Text View”
- An Image named “Fork Image” with this asset:
- Issues
- An Image named “Issue Image” with this asset:

- The text “Issues”, with the Element named “Issue Label” / “Issue Text View”
- The text “0”, with the Element named “Issue Count Label” / “Issue Count Text View”
- An Image named “Issue Image” with this asset:
Style the Elements so that the Images are around the same height as a line of text, with transparent backgrounds. Choose a smaller font size for these text Elements than for the name text above them.
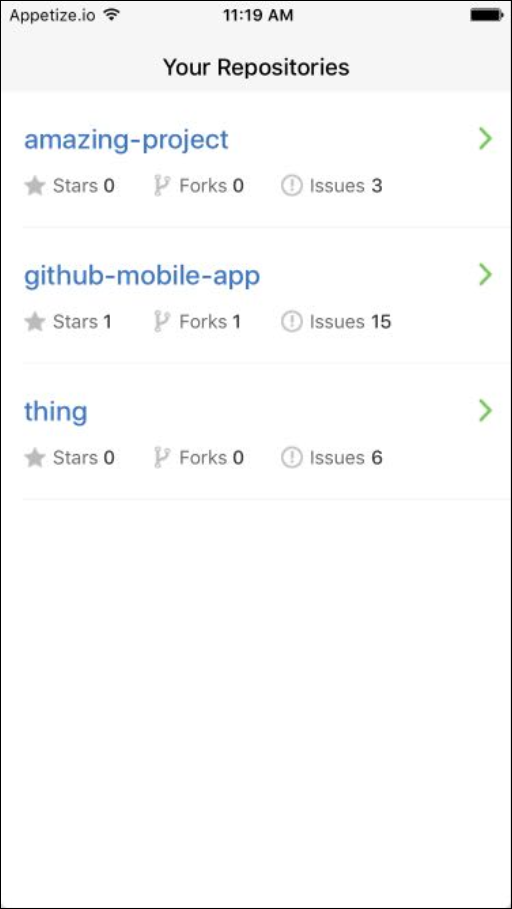
Your page should look something like this:

Show Repo Details
You added the GET request last time, so now you can display its fields in the Elements. In API, open the request and select Responses.
The API returns the repositories in an array, which appears in Dropsource as a Data Source. You can display the Data Source in a dynamic Element, which will repeat its child Element for each item in the array. Bind the Data Source to the Table / List, either by clicking and dragging it onto the Canvas, or by clicking and selecting the Element.

Now you can bind the fields inside the array to the Elements inside the Cell / Tile. Bind the fields as follows:
- name to the Repo Name text Element
- stargazers_count to the Star Count text Element
- forks_count to the Fork Count text Element
- open_issues_count to the Issue Count text Element
You can test the app now and see the list of repos appear once logged in. Next you will add a page to display issues on any repo the user selects in the list, so you will revisit this page to add navigation.